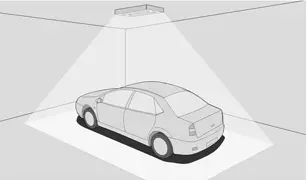
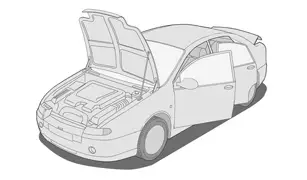
Peugeot 308: New vehicle preparation : Technical and aesthetic preparation of the vehicle
N.B. : The modifications to this version are listed at the end of the document (Refer to section : Appendix).
ESSENTIAL : Observe the safety and cleanliness recommendations
 .
.
CAUTION : Carry out the preparation of new vehicles as close as possible to the date, and to the place, of handover to the customer.
CAUTION : No New Vehicle Preparation work should be carried out on an accident damaged new vehicle.
CAUTION : If abnormal behaviour of the vehicle is noticed during the New Vehicle Preparation, schedule workshop diagnostics.
CAUTION : Fill out the "new vehicle preparation check-list" as each of the operations is completed (Specific document).
CAUTION : Date and sign the "new vehicle preparation check-list" on completion of the operations.
The New Vehicle Preparation is the operation which precedes delivery of the vehicle to the customer.
Customer satisfaction depends on this preparation being carried out to a high standard.
Carry out this preparation with the aim of quality and customer satisfaction.
N.B. : Check that any damage having given rise to an entry on the Appearance Referential (RUA) (document AD 249 Ter "Delivery/Reception Declaration"), having occurred between the factory park and the arrival at the dealership (or its sub-contractor), has been correctly repaired.
1. Operations to be performed during pre-delivery inspection (PDI)
The table below describes the operations to be carried out depending on the vehicle and the site at which the new vehicle preparation is carried out.
1.1. PEUGEOT and CITROËN vehicles for France and Belgium
CAUTION : (1) - List of operations for PEUGEOT and CITROËN vehicles for France and Belgium.
N.B. : Complete the "lighter new vehicle preparation check-list" as the operations are carried out (Access route : Organisation↦Aftersales methods↦New Vehicle Preparation standards (PVN)↦Checklist methods and models↦"lighter" checklist model.
1.2. PEUGEOT and CITROËN vehicles for other countries
CAUTION : (2) - List of operations for PEUGEOT and CITROËN vehicles for other countries.
N.B. : Fill out the "new vehicle preparation check-list" as each of the operations is completed (Access route : Organisation↦Aftersales methods↦New Vehicle Preparation standards (PVN)↦Checklist methods and models↦"complete" checklist model.
| Section | Operations to be carried out | (1) | (2) |
| 4 | Conformity of the vehicle | X | X |
| 5 | Electronic conformity of the vehicle | ||
| -- 5.1 | Check of the ancillaries battery | X | X |
| -- 5.2 | Configuration to customer mode (Park shunt) | X | X |
| -- 5.3 | Checking the traction battery | X | X |
| -- 5.4 | Checking and initialising the windows and doors and tailgate | X | |
| -- 5.5 | Check of the vehicle | X | X |
| -- 5.6 | Start of the global test | X | |
| 6 | Checking the levels | ||
| -- 6.2 | Engine oil | X | X |
| -- 6.3 | Power steering fluid | X | |
| -- 6.4 | Engine coolant | X | |
| -- 6.5 | Brake fluid | X | |
| -- 6.6 | Screen washer fluid | X | X |
| 7 | Check of the wheels | X | X |
| 8 | Checks under the body | X | |
| 9 | Interior/exterior vehicle checks | ||
| -- 9.1 | Key / Remote control / Hands-free identifier | X | X |
| -- 9.2 | Key / Engine starting / Hands-free identifier | X | X |
| -- 9.3 | Openings and access | X | X |
| -- 9.4 | Lighting and signalling lamps | X | |
| -- 9.5 | Direction indicators and hazard warning lamps | X | |
| -- 9.6 | Interior rear view mirror and door mirrors - Interior lighting | X | |
| -- 9.7 | Driver´s seat - Seat belts | X | |
| -- 9.8 | Passenger’s airbag deactivation | X | |
| -- 9.9 | Multifunction screen / Display in the instrument panel / Audio system / Audio-navigation system / Multifunction touch screen | X | X |
| 10 | Road test | X | |
| 11 | Exterior preparation of the vehicle : Preparation - Deprotection - Wash - Check | X | X |
| 12 | Interior preparation of the vehicle : Deprotection - Cleaning - Check | X | X |
| 13 | Final operations | X | X |
2. Summary
The New Vehicle Preparation procedure illustrates the following chapters :
- Recommendations/precautions

- Conformity of the vehicle

- Electronic conformity of the vehicle

- Checking the levels

- Check of the wheels

- Checks under the body

- Interior/exterior vehicle checks

- Road test

- Exterior preparation of the vehicle

- Interior preparation of the vehicle

- Final operations

3. Recommendations/precautions
Safety and cleanliness precautions and recommendations
 .
.
N.B. : If the infrastructure of the workshop does not permit this, it is compulsory that the ancillaries battery check is carried out, in "parc shunt" mode, during the very first operations.
N.B. : (*) According to version or equipment.
INTERNAL COMBUSTION DRIVE TRAIN OR PHEV DRIVE TRAIN OR MHEV DRIVE TRAIN
The new vehicle preparation must always be carried out using the diagnostic tool connected to the vehicle and connected to the Internet.
N.B. : Carry out the following operations in the order of the sections below.
4. Conformity of the vehicle
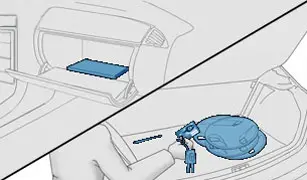
4.1. Handbook pack and other items
| Illustration | operation |
| Check that all the removable components (handbook pack and other items) ticked on the Delivery Note (DC41) or mentioned on the Loose Items Sheet (FFA) are indeed present in the vehicle |
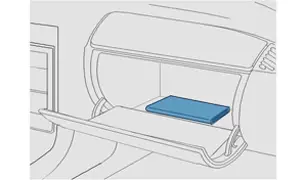
PHEV DRIVE TRAIN
N.B. : Check for the charging cable(s) and a storage bag (*).
N.B. : (*) According to version or equipment.
N.B. : If anything is missing, note it down on the "new vehicle preparation check-list" so that the handbook pack and other items are restored to conformity prior to handover to the customer.
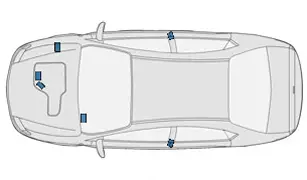
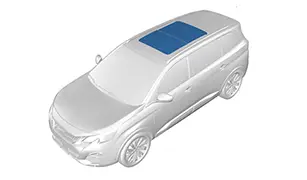
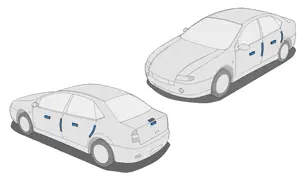
4.2. Vehicle identification
| Illustration | operation |
| Check the conformity of the vehicle identification number (VIN)- Indicated on the label at the base of the windscreen- Engraved on the vehicle (Cold stamped inscription)- Indicated on the manufacturer’s plate (located on the centre pillar or on the front or rear door according to vehicle)- Indicated on the "new vehicle preparation check-list" |
INTERNAL COMBUSTION DRIVE TRAIN OR PHEV DRIVE TRAIN OR MHEV DRIVE TRAIN
Check that the After Sales and replacement parts (APV/PR) identification label is present, affixed to one of the vehicle’s doors
 .
.
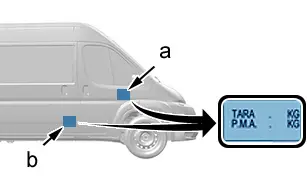
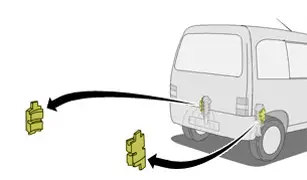
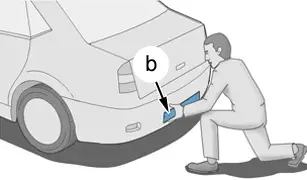
4.3. Commercial vehicles
Tare weight plate label / Utility vehicle to private vehicle conversion label (According to country of registration).
| Illustration | operation |
| First possibility |
| Check that the tare weight plate label is present (At "a" or "b") | |
| Second possibility |
| Check that the tare weight plate label is present (At "a" or "b") | |
| Third possibility |
| Check that the utility vehicle to private vehicle conversion label is present(at "a") |


5. Electronic conformity of the vehicle
5.1. Check of the ancillaries battery
N.B. : The "E-XTEQ" battery tester must be used during new vehicle preparation (NVP) 3 months after the E-XTEQ battery tester (DS ONE) has been rolled out in the country.
N.B. : "MIDTRONICS" codes/tickets will no longer be accepted as proof under 3-month warranty after the E-XTEQ (DS ONE) battery tester has been rolled out in the country.
CAUTION : When using the "E-XTEQ" battery tester, the procedure outlined in the document must be followed : Instructions for use of the "E-XTEQ" battery tester
 .
.
CAUTION : The use of the "MIDTRONICS" tools must follow the procedure described in the document : Instructions for using the "Midtronics" battery tester
 .
.
INTERNAL COMBUSTION DRIVE TRAIN OR PHEV DRIVE TRAIN OR MHEV DRIVE TRAIN
CAUTION : The ancillaries battery check must be carried out with the shunt in the "park" position.
Check of the ancillaries battery
 .
.
CAUTION : Perform the operations to be carried out before disconnection or after reconnection of the ancillaries battery
 .
.
CAUTION : To guarantee a reliable voltage reading, take the measurement on a vehicle at rest.
| Illustration | operation |
| When carrying out work on the battery which requires disconnection of the spade terminals, check the hold of the battery spade terminals |
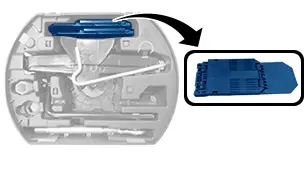
5.2. Configuration to customer mode (Park shunt)
INTERNAL COMBUSTION DRIVE TRAIN OR PHEV DRIVE TRAIN OR MHEV DRIVE TRAIN
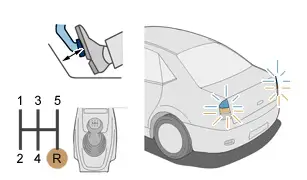
CAUTION : When the shunt is in the park position : It is necessary to press the clutch pedal in order to start the engine(depending on the BSI version).
Place the shunt in the "customer mode" position
 .
.
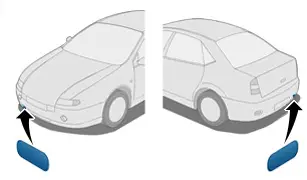
5.2.1Vehicles fitted with emergency and assistance call buttons :
- After configuration to customer mode
- Switch on the ignition
- Wait 5 seconds
- Check that the "SOS" LED on the emergency call button is not lit in red (Permanent or flashing)
N.B. : If the "SOS" LED on the emergency call button is lit in red or if it is not lit, mention this on the "new vehicle preparation check-list".
5.3. Checking the traction battery
N.B. : No checks on the traction battery for MHEV vehicles.
INTERNAL COMBUSTION DRIVE TRAIN OR MHEV DRIVE TRAIN
Only applicable to hybrid vehicles.
PHEV DRIVE TRAIN
Check that the traction battery charge level is higher than 25%.
5.4. Checking and initialising the windows and doors and tailgate
INTERNAL COMBUSTION DRIVE TRAIN OR PHEV DRIVE TRAIN OR MHEV DRIVE TRAIN
| Illustration | operation |
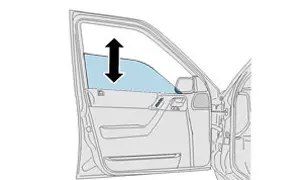
| Check the operation of the electric windows |
| - Checking the manual operationPress on each of the buttons operating the windows : Short press (1-2-3-4) (*)- Checking the sequential operationPress on each of the buttons operating the windows : Long press (1-2-3-4) (*)If there is any malfunctioning, perform the procedure for initialising the electric windows | |
| Check the operation of the sunroof and the blind (*) |
| Initialisation : See the initialisation procedure (*) (if necessary) | |
| Initialising of the electric windows (*) |
| - Switch on the ignitionIf the closing is jerky- Maintain the closing command for 3 seconds after the window has fully closed- Maintain the opening command for 3 seconds after the window has fully opened |

N.B. : (*) According to version or equipment.
5.5. Check of the vehicle ; Using the diagnostic tool
CAUTION : Keep either a print-out or a recording of the new vehicle preparation electronic report.
It is essential to check the electronic conformity of the vehicle ; Using the diagnostic tool.
Prerequisite :
- The diagnostic tool must be at the latest update version available on the remote update server
- It is compulsory that the check of the vehicle is carried out using the diagnostic tool in Internet connected mode and with identification of the new vehicle preparation technician
N.B. : Do not disconnect the diagnostic tool at the end of the check for PEUGEOT and CITROËN vehicles for France and Belgium.
INTERNAL COMBUSTION DRIVE TRAIN OR MHEV DRIVE TRAIN
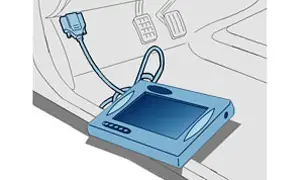
| Illustration | operation |
| - Switch the ignition+ off and then on, or press on the engine starting switch, without pressing on the brake pedal (Vehicle with hands-free access and starting)- Connect the diagnostic equipment to the vehicle’s diagnostic socket |
PHEV DRIVE TRAIN
| Illustration | operation |
| - Open the driver’s door- Depress the brake pedal and press the engine starting switch (START) : To reactivate "READY" mode- Switch off the ignition (Press the engine starting switch (START) once)- Switch to ignition positive (+APC) (Switch the ignition back on or press the engine starting switch (START) again)- Connect the diagnostic equipment to the vehicle’s diagnostic socket |

Follow the content proposed by the diagnostic tool :
- Select the vehicle
- Compare the VIN indicated by the diagnostic tool with the number on the "new vehicle preparation check-list"
- If the VIN is not indicated by the diagnostic tool, enter the VIN manually
- Select the "Customer delivery" menu
- Select the "New vehicle preparation" menu
- Check the conformity of the "identification" information displayed by the diagnostic tool, correcting it if necessary
- Enter the first 5 characters of the after-sales/parts (APV/PR) no.
- Select the country in which the vehicle is sold by identifying the flag
- Follow the instructions given in the diagnostic tool
- First case : Follow the procedure for downloading the "E-XTEQ" battery tester result regarding the ancillaries battery 1 charge status
- Second case : Enter the results of the ancillaries battery 1 check carried out using the MIDTRONICS battery tester
- - First possibility : Automatic receipt of the results (Via infrared)
- - Second possibility : Manually enter the ancillaries battery 1 charge status and the code provided by the MIDTRONICS tool
- Follow the instructions given in the diagnostic tool
- Change the servicing schedule(If necessary)
- Specify whether the VIN is affected by a modernisation campaign (Yes / No specified on the "new vehicle preparation check-list", via the manufacturer’s after-sales documentation portal)
N.B. : The electronic report of the passage to the diagnostic tool is available on the diagnostic tool "Report" tab for printing or saving.
N.B. : The electronic report of the passage to the diagnostic tool is available for later consultation only on the diagnostic tool used during the check.
The electronic report may indicate the need to carry out additional operations (After a vehicle storage period that is greater than 12, 15 or 18 months depending on the country of sale and engine) :
- Draining and replacing of the brake fluid in the primary circuit (Not ABS circuit) (*)
- Draining and replacement of the brake fluid of the primary and hydraulic clutch control circuit (Not ABS circuit) (*)
- Replacing of the engine oil (Except electric vehicles )
- Replacing of the aerosol in the temporary tyre repair kit (Provided the deadline is prior to the warranty end date)
- Draining of the urea reservoir and filling of the urea circuit (*)
- ...
N.B. : (*) According to version or equipment.
N.B. : When filling the urea reservoir, observe the recommended quantity of urea solution ; The additional operations must be performed only by qualified operators.
5.6. Start of the global test ; Using the diagnostic tool
CAUTION : Print and retain the global test report (Fault finding).
Carry out the global test ; Using the diagnostic tool :
- Return to the home page of the diagnostic tool operations menu
- Select "Search for faults"
- The diagnostic tool identifies the ECUs and reads the memories of the ECUs
The global test, which must be carried out with the diagnostic tool connected to the vehicle and connected to the Internet, permits reporting to the STELLANTIS systems of the "Electronic condition of the vehicle". The statistical processing of this data is part of a procedure of continuous improvement of the quality of our vehicles and of our processes (design, manufacture, logistics, storage, new vehicle preparation).
CAUTION : Aucun voyant d’alerte ne doit rester allumé au combiné (Moteur thermique tournant ou machine électrique de traction sous tension). If a fault warning lamp comes on, enter this in the "new vehicle preparation check-list" and inform the workshop controller.
5.7. Actions to be taken if the ancillaries battery 2 charge status check report is not OK
INTERNAL COMBUSTION DRIVE TRAIN OR MHEV DRIVE TRAIN
Only applicable to hybrid vehicles.
PHEV DRIVE TRAIN
N.B. : The ancillaries battery 2 charge status check report is integrated within the "summary of operations" section.
5.7.1 - If the result is : Battery requires charging.
Charge the ancillaries battery 2 with one of the 2 solutions below.
N.B. : Charging the ancillaries battery 1 allows the ancillaries battery 2 to be charged.
5.7.1.1 - Solution no. 1 : 1-hour charging procedure (If a battery charger is available) .
CAUTION : The recharging must be carried out in a well-ventilated area.
CAUTION : The battery charger must have a charging voltage between 14 and 15,5 V, otherwise there is a risk of causing multiple faults.
CAUTION : The ancillaries battery temperature must be between 10 and 35°C before recharging ; To check the temperature, use the information provided by reading the ancillaries battery charge status unit parameter.
Procedure to be followed ; If the vehicle is in "READY" mode :
- Switch off the ignition (Press the engine starting switch (START) once)
- Wait for 1 minute
- Connect the battery charger to the ancillaries battery 1
- Switch to ignition positive (+APC) (Switch on the ignition to ignition positive (+APC) or press the engine starting switch without depressing the brake pedal)
- After 1 hour of charging, switch off the ignition (Contact OFF)
- Disconnect the charger
Procedure to be followed ; If the vehicle is stationary (Without ignition positive (+APC)) :
- Connect the battery charger to the ancillaries battery 1
- Switch to ignition positive (+APC) (Switch on the ignition to ignition positive (+APC) or press the engine starting switch without depressing the brake pedal)
- After 1 hour of charging, switch off the ignition (Contact OFF)
- Disconnect the charger
5.7.1.2 - Solution no. 2 : Procedure 3 times for 10 minutes in "READY" mode (If no battery charger is available) .
Ancillaries battery 2 charge conditions :
- Traction battery charged to a minimum of 25% (or at least 2 bars on the instrument panel) to be able to start the ancillaries battery 2 charge
- Vehicle in customer mode
- Reading and clearing of the fault codes
- Electric Parking Brake applied
- With mode "Ready" activated
- All of the current consumers switched off (headlamp unit, air conditioning, heating, audio system etc.)
- Driver’s seat belt fastened
Procedure to be followed :
- 1.Open the driver’s door
- 2.Activate "Ready" mode
- 3.Fasten the driver’s seat belt
- 4.Get out of the vehicle
- 5.Close the driver’s door
After 10 minutes :
- 6.Open the driver’s door
- 7.Press the engine starting switch (STOP)
- 8.Depress the brake pedal and press the engine starting switch (START) : To reactivate "READY" mode
- 9.Get out of the vehicle
- 10.Close the driver’s door
- 11.Wait 10 minutes
Repeat the operation from stage 6 in such a way as to reach a total of 30 minutes of charge.
The operation is complete after reaching a total of 30 minutes of charge.
N.B. : If one of the doors/windows is opened during the 10-minute charging cycles, the ancillaries battery 2 will stop charging.
N.B. : If the presence of the driver is not detected, the system automatically stops the ancillaries battery 2 charge after 11 minutes.
After charging the ancillaries batteries, repeat the process for checking the ancillaries battery 2 using the diagnostic tool.
N.B. : The ancillaries battery 2 charge status check report must be OK.
PHEV DRIVE TRAIN
5.7.2 - If the result is : Battery must be replaced.
CAUTION : Observe the disconnection instructions for ancillaries batteries 1 and 2 (According to the procedure : Repair procedure
 : Ancillaries batteries
 .
.
Replace the ancillaries battery 2.
After replacing the ancillaries battery 2, repeat the process for checking the ancillaries battery 2 using the diagnostic tool.
N.B. : The ancillaries battery 2 charge status check report must be OK.
6. Checking the levels
6.1. General
At the time of the new vehicle preparation, the reservoirs must be filled to the optimum level :
- Level not in conformity : Top up
- If the topping-up required is significant, do a visual search for leaks and mention it on the "new vehicle preparation check-list"
6.2. Engine oil
CAUTION : Top up the levels using recommended products
 .
.
N.B. : Checking of the oil level should be carried out with the vehicle on a horizontal surface and engine switched off for at least 10 minutes.
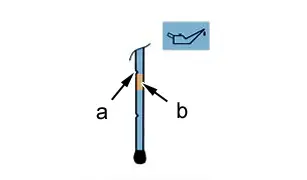
| Illustration | operation |
| - Check the oil levelThe oil level should be in the top half of the "minimum/maximum" zone(at "b")The level must never exceed the maximum mark "a"- If the level exceeds the mark "a", the excess oil must be removed |
6.3. Power steering fluid
CAUTION : Top up the levels using recommended products
 .
.
INTERNAL COMBUSTION DRIVE TRAIN OR MHEV DRIVE TRAIN
| Illustration | operation |
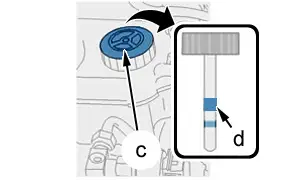
| "c" Power steering fluid reservoir symbol |
| Method of checking the power steering fluid level- Place the vehicle on ground that is flat and horizontal- Engine stopped- Undo the cap on the power steering fluid reservoir- Wipe the gauge- Do up the cap on the power steering fluid reservoir- Undo the cap on the power steering fluid reservoir- Check the level of power steering fluid on the gaugeThe level must be as close as possible to the maximum mark "d"The oil level should be in the top half of the "minimum/maximum" zone(at "d")- If the level exceeds zone "d", remove the excess power steering fluid |
N.B. : Vehicles fitted with electric power steering do not have a power steering fluid reservoir.
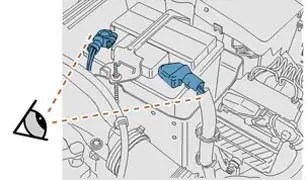
6.4. Engine coolant
CAUTION : Top up the levels using recommended products
 .
.
| Illustration | operation |
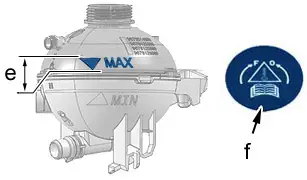
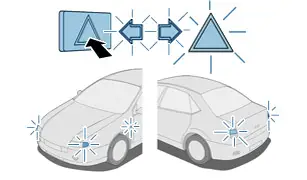
| "f" Reference symbol on the coolant reservoir |
| To compensate for the consumption of coolant during the first opening of the thermostatic regulator, the engine coolant level must be within the zone "e"- Check the coolant fluid levelThe coolant level must be within the zone "e"The zone "e" is between the lower tip of the "MAX" triangle and the horizontal line of the "MAX" triangle(at "e")- If the level is above the zone "e" ; Remove the excess engine coolant- If the level is below the zone "e" ; Top up the engine coolant |
6.5. Brake fluid
CAUTION : Top up the levels using recommended products
 .
.
INTERNAL COMBUSTION DRIVE TRAIN OR PHEV DRIVE TRAIN OR MHEV DRIVE TRAIN
| Illustration | operation |
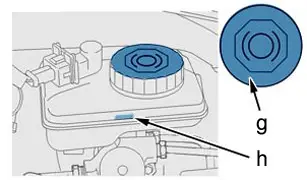
| "g" Symbol on the brake fluid reservoir |
| - Check the brake fluid levelThe oil level should be in the top half of the "minimum/maximum" zone(at "h")- If the level exceeds zone "h", remove the excess brake fluidThe level must be as close as possible to the maximum mark "h" |
6.6. Screen washer fluid
CAUTION : Use windscreen wash fluid distributed by Replacement Parts
 .
.
| Illustration | operation |
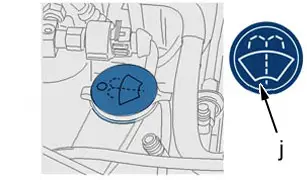
| "j" Symbol on the screen wash fluid reservoir |
| - Top up with windscreen washThe screenwash reservoir must be full to maximum, without overflowing |
7. Check of the wheels
7.1. Checking the conformity of the tyres
Check the coherence between the specifications indicated on the APV/PR label and on the tyres :
- Width of the tyre
- Height of the tyre
- Inside diameter of the tyre (inches)
- Load index
- Speed index
7.2. Checking the spare wheel or temporary puncture repair kit
Check the presence of the spare wheel, or of the temporary puncture repair kit.
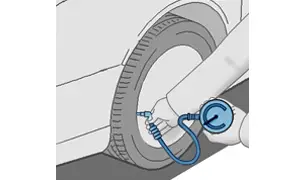
7.3. Check of the condition and pressure of the tyres(including the spare wheel)
ESSENTIAL : Incorrect pressures in the tyres involves serious safety risks for the customer.
CAUTION : Always adjust the tyre pressures when cold.
CAUTION : Observe the procedure for adjusting the pressure of the tyres.
Adjusting the pressure of the tyres :
- Use a pressurised pressure gauge
- Drop the pressure of the tyres to below the recommended value
- Correct the pressure of the tyres
| Illustration | operation |
| - Adjust the pressure of the tyres to minimum load and minimum speed configuration if indicated on the After Sales/Parts label- Adjust the pressure of the spare wheel if indicated on the After Sales/Parts label- If the information relating to the spare wheel is not available on the After Sales/Parts label, adjust the pressure of the spare wheel to the highest pressure indicated on the After Sales/Parts labelThe pressure is indicated on the "space-saving" type spare wheels- Do not forget to refit and tighten the valve caps after setting the tyre pressures |
N.B. : Check there are no tears or bulges in the tyres.
INTERNAL COMBUSTION DRIVE TRAIN OR PHEV DRIVE TRAIN OR MHEV DRIVE TRAIN
Reinitialise the indirect tyre under-inflation detection system
 .
.
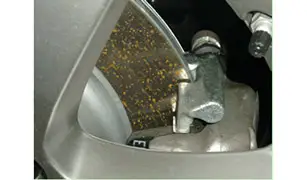
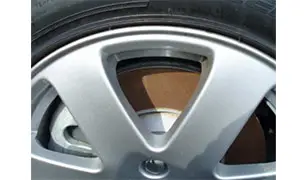
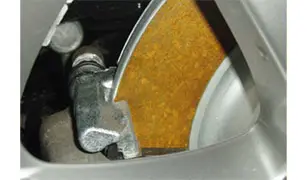
7.4. Visual check of the corrosion of the brake discs (Only valid for countries applying lighter "New Vehicle Preparation")
| Illustration | Result of the check | Compliance |
| Partial surface corrosion (Stains on the brake discs that do not require a specific cleaning method) | Correct : Tick the conformity in the "checklist" |
| Complete surface corrosion of the brake discs | Does not conform : Tick the non-conformity in the "checklist" for applying the specific cleaning method indicated in the B200440 standard, "Check of the brake discs and brake pads of new vehicles stored in park mode" |
|

7.5. Fitting the wheel trims
CAUTION : Do not use tools.
N.B. : (*) According to version or equipment.
INTERNAL COMBUSTION DRIVE TRAIN OR PHEV DRIVE TRAIN OR MHEV DRIVE TRAIN
CAUTION : The vehicle is fitted with specific wheel trims
 (*) : Failure to follow the removal/refitting procedure will result in significant damage to the wheel trims
 .
.
| Illustration | operation |
| Fit the wheel trims on the steel wheels (*) |
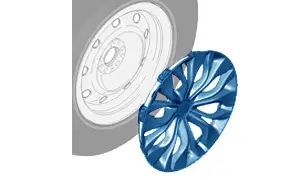
Perform the following operations :
- Insert the wheel trim by centring it correctly (passage of the valve) and by first inserting the lugs located around the passage of the valve
- Insert the lugs around the remaining circumference of the wheel
- Insert the last lug with care
- Visually check that none of the lugs has been broken during fitting
- Do an appearance check on the trims
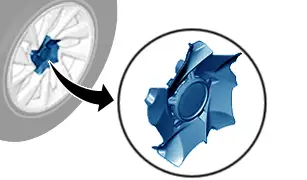
| Illustration | operation |
| Nut cover protector |
| - Fit the alloy wheel protectors (*)- Check the appearance of the protectors | |
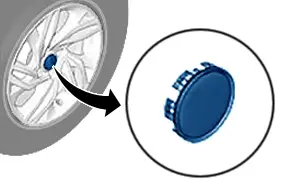
| Alloy wheel hub central cover protector |
| - Fit the alloy wheel protectors (*)- Check the appearance of the protectors | |
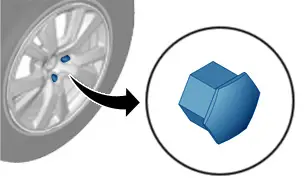
| Alloy wheel nut trims (*) |
| - Fit the alloy wheel nut trims- Do an appearance check on the trims |
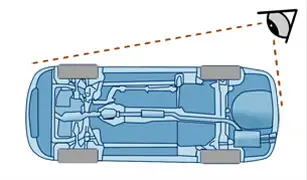
8. Checks under the body
CAUTION : Do not remove the protective screen under the body in order to carry out the checks below.
N.B. : Carry out the vehicle checks on a ramp or over a workshop pit.
8.1. Check under the body of the underbody and of the under engine protector
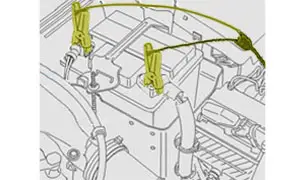
PHEV DRIVE TRAIN
ESSENTIAL : Electric and hybrid vehicles : Do not touch the high voltage cables (Orange colour).
CAUTION : To check the condition of the floorpan / the underbody of a hybrid or electric vehicle, take car to avoid trapping the cables and pipes with the hoist’s lifting pads when raising the vehicle.
CAUTION : Visually check the condition of the high voltage cables (Orange colour).
| Illustration | operation |
| Visually check- The condition of the floorpan- The absence of knocks- Check that the fixings for the protective screen under the engine are secure |
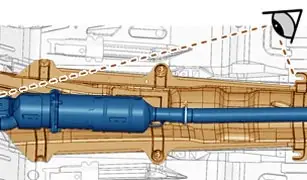
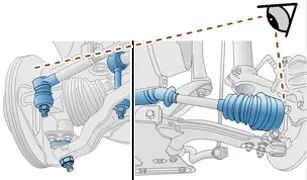
8.2. Under-body check of the exhaust line, the driveshaft gaiters, he steering ball joints and the handbrake cables
| Illustration | operation |
| Visually check- The appearance of the exhaust line and the positioning of the fixings (hangers in place, etc.)- The absence of knocks |
| Visually check- The condition of the drive shaft gaiters- The condition of the steering ball joints and gaiters- The condition of the handbrake cables |
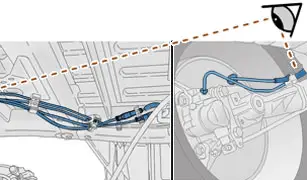
8.3. Check for the absence of leaks
N.B. : (*) According to version or equipment.
| Illustration | operation |
| Check for leaks on the following components- The hoses of all of the circuits- The fuel tank - The urea reservoir (*)- The pipes fixed under the body |
| Check for leaks on the following components- The bodies of the 4 dampers and their surrounding areas- The 4 wheels (Tyres and wheel rims) |
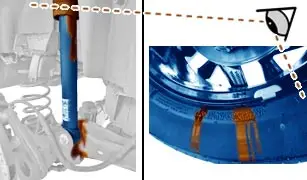
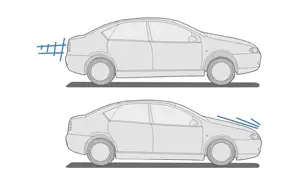
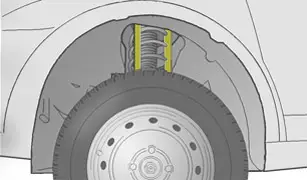
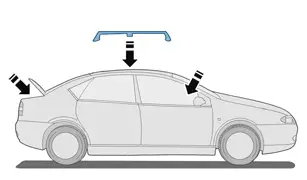
8.4. Height setting shims - Transportation clamps - Towing eye access flaps
ESSENTIAL : Remove the height setting shims or transportation clamps before the road test.
CAUTION : If the vehicle is transported after the road test, do not remove the stickers indicating the presence of the height setting shims and refit the height setting shims after the road test.
N.B. : Operations to be carried out according to version or equipment.
| Illustration | operation |
| If adhesive is visible indicating the presence of height setting shims |
| - Place the vehicle on a ramp with the wheels hanging free or raise each wheek using a jack- Remove the shims from the vehicle- Remove the sticker indicating the presence of height setting shims (Only if the vehicle is no longer being transported) | |
| If adhesive is visible indicating the presence of transportation clamps |
| - Strap the vehicle to compress the suspension- Remove the rear suspension transportation clamps- Remove the sticker denoting the presence of transportation clamps | |
| If there are access flaps for the towing eye in the tool kit or the dashboard storage compartment |
| - Fit the towing eye access flaps on the front and rear bumpers |

9. Interior/exterior vehicle checks
N.B. : Checks to be carried out according to version or equipment.
9.1. Key / Remote control / Hands-free identifier
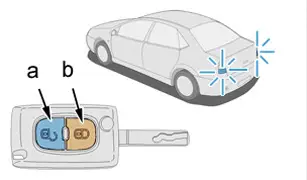
| Illustration | operation |
| Check that the unlocking "a" and locking "b" system is functioning correctly (On all the keys) |
| - Press each button "a" and "b" on the high frequency remote control or hands-free identifier (*)- Check that the lights flash when the doors are unlocked- Check that the lights come on when the doors are locked | |
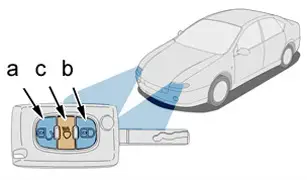
| Check that the guide-me-home lighting is working |
| - Press button "c" on the high frequency remote control or hands-free identifier (*)- Check that the sidelamps and dipped beams activate (Around one minute) | |
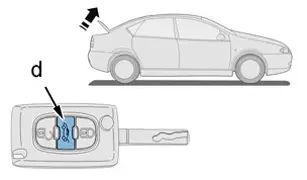
| Check that the motorised boot lid opens and closes (*) |
| - Press button "d" on the high frequency remote control or hands-free identifier (*)- Check that the motorised boot lid opens and then closes | |
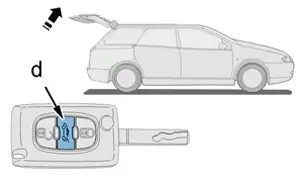
| Check that the motorised tailgate is opening and closing correctly (*) |
| - Check that the motorised boot lid opens and then closes (*)- Press button "d" on the high frequency remote control or hands-free identifier (*) | |
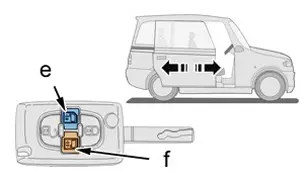
| Check that the motorised sliding side doors open and close (*) |
| - Press buttons "e" and "f" on the high frequency remote control- Check the operation of opening/closing of the motorised sliding side doors | |
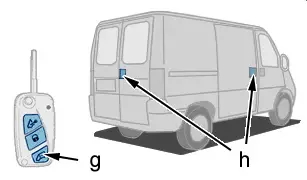
| Commercial vehicles |
| Check only that the locking/unlocking of the load space is working- Press button "g" on the high frequency remote control- Check the operation of the locking/unlocking of the load space only(at "h") |
N.B. : (*) According to version or equipment.
9.2. Key / Engine starting / Hands-free identifier
Check that the vehicle starts using all the keys.
Vehicle with hands-free starting (*).
CAUTION : The operator must have one hands-free identifier on him during the checking operations, the other hands-free identifier must remain more than 2 metres from the vehicle.
INTERNAL COMBUSTION DRIVE TRAIN OR PHEV DRIVE TRAIN OR MHEV DRIVE TRAIN
Check the functioning of the starting of the vehicle using the hands-free identifiers
 .
.
Check the functioning of the starting of the vehicle in hands-free mode
 .
.
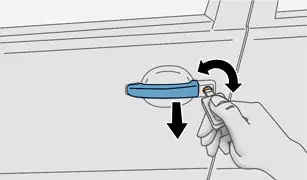
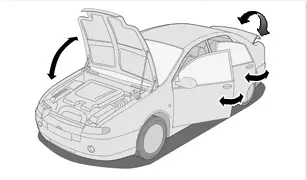
9.3. Openings and access
| Illustration | operation |
| Try all of the keys |
| Check that the doors are working |
| - Open the doors- Open the bonnet- Open the boot lid (*)- Open the tailgate (*)- Open the opening tailgate window (*)- Open the tailgate (*)- Check that there is no abnormal noise- Assess the quality of how well all the openings close | |
| Check the operation of the opening of the fuel filler flap or the traction battery charging flaps |
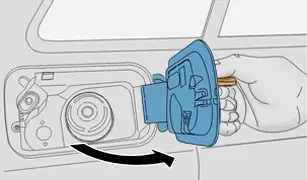
N.B. : (*) According to version or equipment.
INTERNAL COMBUSTION DRIVE TRAIN OR PHEV DRIVE TRAIN OR MHEV DRIVE TRAIN
Check the hands-free access
 (*).
(*).
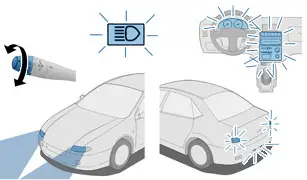
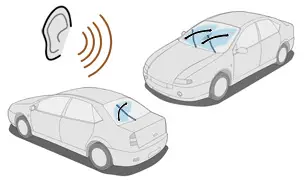
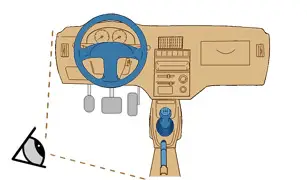
9.4. Lighting and signalling lamps
N.B. : Use mirrors to view the front and rear lamps coming on from inside the vehicle, with the engine running or the "READY" indicator lamp on.
| Illustration | operation |
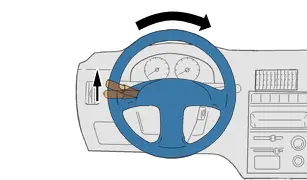
| Checking the lighting and signalling |
| - Activate the steering wheel lights stalk and check the lighting of the sidelamps, dipped headlamps and main beam headlamps- Check that the daytime running lamps come on (*)- Check that the indicator light on the instrument panel comes on- Check that the instrument panel and dashboard equipment light up- Check the number plate lighting | |
| Check that the reversing lamp(s) are working |
| - Position the gear lever in reverse- Check that the reversing lamp(s) come on | |
| Check that the brake lights are working | |
| - Depress the brake pedal- Check that the brake lamps come on | |
| Check of the operation of the front and rear foglamps |
| - Activate the steering wheel lights stalk and check the lighting of the front and rear foglamps (*)- Check that the indicator light on the instrument panel comes on |
N.B. : (*) According to version or equipment.
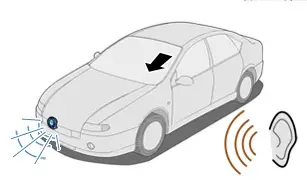
9.5. Direction indicators and hazard warning lamps
| Illustration | operation |
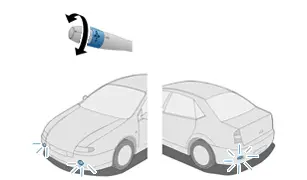
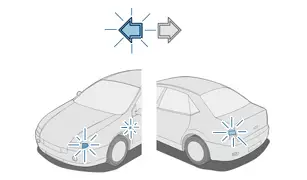
| Check that the direction indicators are working |
| - Activate the steering wheel direction indicators stalk- Check that the front and rear direction indicators, and the side repeaters, operate- Check that the indicator light on the instrument panel comes on- Check that there is a sound signal as the direction indicators operate | |
| Check that the direction indicators cancel when you turn the steering wheel |
| Check the operation of the hazard warning lights |
| - Check that the push button lights up when it is activated- Check that the front and rear direction indicators, and the side repeaters, operate- Check that the indicator light on the instrument panel comes on |
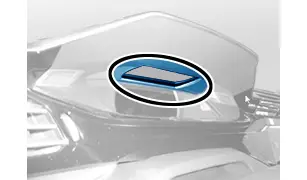
9.6. Interior rear view mirror and door mirrors - Interior lighting
| Illustration | operation |
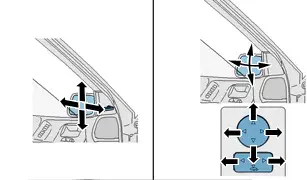
| Check that the exterior mirrors can be adjusted |
| - Operate the mirror control button- Check that the adjustment of the exterior mirrors corresponds to the control | |
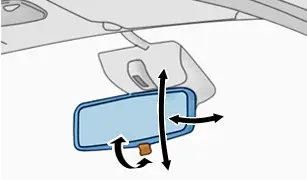
| Check that the interior mirror can be adjusted |
| - Check that there is no resistance when adjusting the interior mirror- Check that the interior mirror is secure- Place the rear view mirror in the automatic position (*) | |
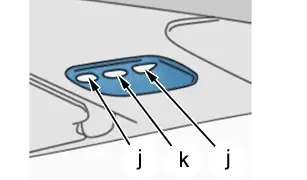
| Check that the interior lighting is working |
| - Check that the map reading lamps "j" come on (*)- Check that the interior lighting comes on (Via the courtesy light button "k")- Check that the interior lighting comes on when the doors are opened- Leave the stalk at automatic mode (*) |
N.B. : (*) According to version or equipment.
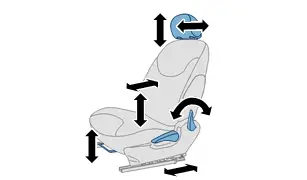
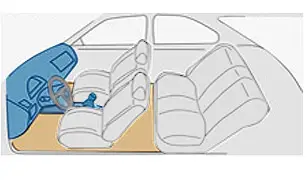
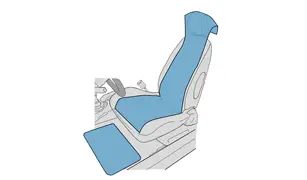
9.7. Driver´s seat - Seat belts
| Illustration | operation |
| Check that the driver’s seat adjustment controls are working |
| - Check the forward-backward adjustment- Check the backrest angle adjustment- Check the seat cushion adjustment- Check the adjustment of the lumbar supports (*)- Check the head restraint height adjustment (*) | |
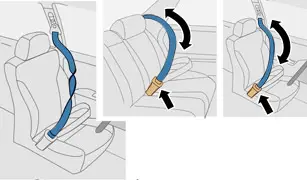
| Check that the front and rear seat belts are working |
| - Check the condition of the seat belt straps- Check the condition of the seat belt buckle straps- Check the quality of sliding of the seat belt straps- Check the locking and unlocking of each seat belt buckle- Check the operation of the force limiter on the seat belts : Pull sharply on the seat belt strap and check that the seat belt locks | |
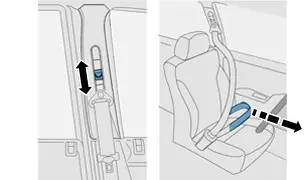
| Check that the height adjustment device on the front seat belts is working (*) |
| - Check that there are no points of resistance - Check the quality of sliding of the seat belt straps |
N.B. : (*) According to version or equipment.
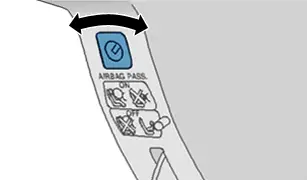
9.8. Passenger’s airbag deactivation
INTERNAL COMBUSTION DRIVE TRAIN OR PHEV DRIVE TRAIN OR MHEV DRIVE TRAIN
ESSENTIAL : The vehicle must be handed over to the customer with the passenger airbag control turned to "ON".
| Illustration | operation |
| Check that the passenger airbag deactivation is working |
| - Switch off the passenger air bag : Airbag control on "OFF" (Using the ignition key)- Check that the indicator light on the instrument panel comes on (The indicator lamp remains on with the ignition positive (IGN+) on)- Reactivate the passenger’s airbag : Airbag control on "ON" (Using the ignition key) |
9.9. Multifunction screen / Display in the instrument panel / Audio system / Audio-navigation system / Touch screen
CAUTION : Do not remove the adhesive film from the touchscreen (*).
CAUTION : Do not perform update of the map for European countries.
Operations to be performed :
- Restore the "factory" settings (*) (**)
- Setting of the basic parameters
 (Language - Date and time - Unit of measurement) (*)
 - Checking of the GPS map
 (*)
(*)
N.B. : (*) According to version or equipment.
INTERNAL COMBUSTION DRIVE TRAIN OR PHEV DRIVE TRAIN OR MHEV DRIVE TRAIN
Check the operation of the head up display.
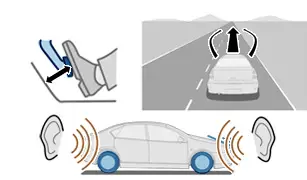
10. Road test
CAUTION : The road test must be carried out observing the regulations in force in the country and the highway code.
N.B. : For the countries in which the law prohibits test driving the vehicle on roads open to public traffic, carry out the following dynamic checks within the Dealership (workshop, car park, etc.). .
Check :
- No abnormal noise, vibration or behaviour
- The steering
- The internal combustion engine (acceleration, stabilised speed, deceleration)
- The gearbox (smooth shift into reverse, first and second gears) (*)
- Braking (efficiency, no offset, noise)
- The Stop and Start function (*)
N.B. : (*) According to version or equipment.
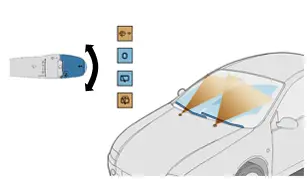
10.1. Recommendations/precautions (Before carrying out the road test)
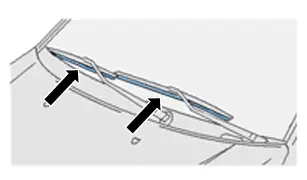
CAUTION : Check that there are no objects placed on the windscreen wiper arms.
CAUTION : If the vehicle has clips protecting the wiper blades (vehicles for Latin America), remove the protection clips from the wiper blades.
| Illustration | operation |
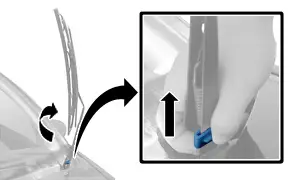
| Protection on the wiper blades (First possibility) (*) |
| - Lift the windscreen wiper arms- Remove the protectors from the wiper blades - Refit the windscreen wiper arms | |
| Protection on the wiper blades (Second possibility) (*) |
| - Lift the windscreen wiper arms- Remove the protection clips from the wiper blades- Refit the windscreen wiper arms | |
| Protection on the wiper blades (Third possibility) (*) |
Remove the protectors from the wiper blades
 | |
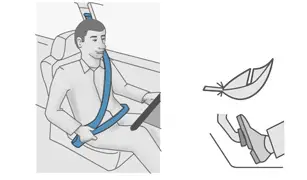
| Before carrying out the road test |
| - Check that the protectors on the driver’s seat and on the carpets are in place | |
| Before carrying out the road test |
| - Fasten the seat belt | |
| During the road test | |
| - Drive the vehicle in a reasonable manner so as not to damage it | |
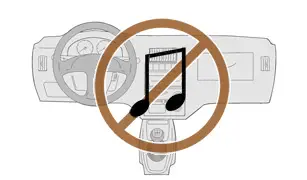
| Carry out a road test : Audio system off |


N.B. : (*) According to version or equipment.
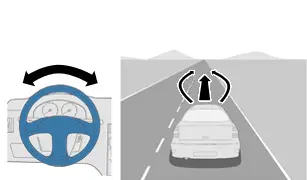
10.2. Vehicle behaviour and instrument panel operation checks
CAUTION : None of the fault warning lamps should come on during the road test. If a fault warning lamp comes on, enter this in the "new vehicle preparation check-list" and inform the workshop controller.
| Illustration | operation |
| Check the behaviour of the vehicle (***)Check that there is no noiseCheck that there are no vibrationsCheck that there is no abnormal vehicle behaviour |
| Check that the vehicle behaves correctly going in a straight line and round bends |
| Vehicle stationary, engine running- Turn the steering wheel to full lock, to the right and to the leftThe steering must be responsive and smooth | |
| Vehicle moving- Release the steering wheel to check that the vehicle does not drift- Check that the steering wheel is aligned correctly | |
| Check the behaviour of the engine in the following situations- Acceleration- Constant speed- Deceleration |
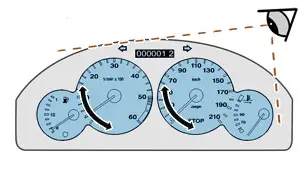
| Operational check of the instrument panel |
| - Check that the odometer increases during the test- Check the operation of counter and instrument panel indicators (Odometer ; Rev counter ; - Power generation/consumption indicator….)- Check that the head up display is working (*) |

N.B. : (*) According to version or equipment.
N.B. : (***) Tell the customer that any vibrations from the tyres arising from flat spotting will disappear after an hour of driving.
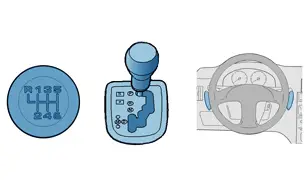
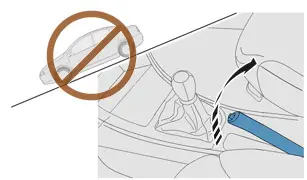
10.3. Gear changing, braking and steering check
| Illustration | operation |
| Note : If it is not possible to test all gear ratios, it is mandatory to check the first, second and third gears and reverse gear |
| /!\ For hybrid vehicles, perform this test in "thermal" mode | |
| Check the behaviour of the vehicle on changing gear | |
| Manual gearbox (*) - Engage all the gearsAll gears should engage without jolts or grinding- Check the operation of reverse gear | |
| Piloted and automatic gearbox (*) - Check the operation in semi-automatic mode (Selector lever and steering wheel gear shift control)- Check the operation in automatic mode- Check the operation of reverse gear | |
| - Check the behaviour of the vehicle on braking and the effectiveness of the brakingCorrect braking distance (at 30 km/h (18 mph), braking distance of approximately 10 m)/!\ A track of at least 50 metres is required- On braking, check that the vehicle does not drift- Check that there is no squealing or noise coming from the pads at the end of braking |
| Check the effectiveness of the parking brake |
| Mechanical handbrake (*)- Apply the parking brake- Engage first gear or position "D"- Try to startThe vehicle should not move forward | |
| Electric parking brake (*)- Switch on the ignitionIf the handbrake is already applied- Press on the brake pedal, keeping it pressed, and pull briefly on the electric handbrake handle to release it- Start the vehicle- Switch off the ignition- Listen for whether the automatic locking of the electronic parking brake is operatingIf the automatic locking of the electronic parking brake is not working, set the parameters in the vehicle configuration menu, then repeat the preceding operations- Switch on the ignition- Start the vehicle- Check the automatic release of the electric parking brake (Operate the clutch and accelerate at the same time) |
N.B. : (*) According to version or equipment.
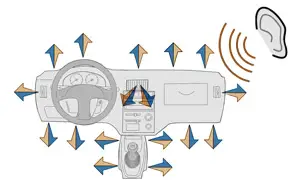
10.4. Checking the operation of the air conditioning, of the screen washers and of the horn
| Illustration | operation |
| Check that the air conditioning is working (*) |
| - Check the arrival of hot air by adjusting the temperature setting to maximum- Check the arrival of cold air by adjusting the temperature setting to minimum- Check that there is no abnormal noise | |
| - Check the operation of the windscreen and rear screen spray jets (*) |
| Check that the windscreen and rear-screen wipers are working (*) |
| - Check the wiping of the entire glazed surface- Check that there is no abnormal noise | |
| Check that the horn is working |
| - Pressing the control activates the audible signal |
N.B. : (*) According to version or equipment.
10.5. Checking the Stop and Start function
INTERNAL COMBUSTION DRIVE TRAIN OR PHEV DRIVE TRAIN OR MHEV DRIVE TRAIN
At the end of the test, check the functioning of the STOP and START system.
10.6. Visual check of the corrosion of the brake discs (Only valid for countries applying the complete "New Vehicle Preparation")
| Illustration | Result of the check | Compliance |
| Partial surface corrosion (Stains on the brake discs that do not require a specific cleaning method) | Correct : Tick the conformity in the "checklist" |
| Complete surface corrosion of the brake discs | Does not conform : Tick the non-conformity in the "checklist" for applying the specific cleaning method indicated in the B200440 standard, "Check of the brake discs and brake pads of new vehicles stored in park mode" |
|


10.7. Refitting the transportation shims
CAUTION : Only if the vehicle is to be transported after the interior and exterior deprotection operations.
| Illustration | operation |
| Strap the vehicle to compress the suspensionFit the transportation shims on the vehicle |
11. Exterior preparation of the vehicle : Preparation - Deprotection - Wash -Check
CAUTION : Remove the ground clearance protectors (front spoiler, under the front bumper, body sill...) only if the vehicle is not to be transported again.
CAUTION : Use only recommended products
 .
.
11.1. Preparation for washing the vehicle
| Illustration | operation |
| Remove all of the exterior protectors (door seals, foam or tubing on the doors and accesses) |
| Remove the special sticker for hybrid and electric vehicles |

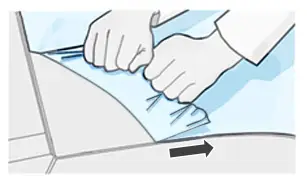
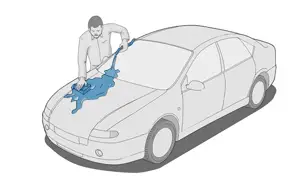
11.2. Deprotecting the exterior of the vehicle
CAUTION : When removing protective coverings from the vehicle, check that the automatic wiping function is not activated (According to equipment).
CAUTION : Never use a tool to begin to detach or remove bonded parts of the vehicle protection.
CAUTION : Use only recommended products
 .
.
| Illustration | operation |
| Deprotect the vehicle:- Adhesive film
 (If the vehicle is fitted with it) :/!\ : Pull the adhesive film parallel to the protected surface until it is completely removed- Protective cover (If the vehicle is fitted with it) :/!\ : Pull the adhesive film parallel to the protected surface until it is completely removed- Protective cover
 (If the vehicle is fitted with it) : (If the vehicle is fitted with it) : |
11.3. Washing the exterior of the vehicle
CAUTION : Do not wash the engine compartment.
CAUTION : When washing at high pressure, the distance of the jet from the surface to be washed must not be less than 30 cm.
CAUTION : In the case of vehicles fitted with frameless doors, do not direct the high pressure jet directly onto the upper section (*).
CAUTION : The use of an automatic car wash (with rollers) is prohibited for cleaning a vehicle with a matt body colour. Use a high or low pressure washer with the appropriate recommended products to maintain the original appearance of the paintwork (*).
CAUTION : When cleaning a vehicle with a textured body colour, do not use polish for touch-ups or finishing wax at the end of washing (the matt appearance may be lost resulting in a gloss appearance). Use the appropriate recommended products to maintain the original appearance of the paintwork (*).
CAUTION : Before washing, check that the automatic wiping is not activated (*).
N.B. : (*) According to version or equipment.
PHEV DRIVE TRAIN
CAUTION : Check that the traction battery charging flap is closed before washing the vehicle. Do not point the high pressure jet directly onto the charging flap or onto the traction battery (Under the body). Do not wash the electric machine compartment.
CAUTION : For hybrid vehicles fitted with an electric parking brake, observe the special instructions for use of a tunnel washer with conveying of the vehicle.
Depending on the installation of the tunnel washer with conveying of the vehicle, the internal combustion engine should be off or on.
Washing the vehicle with the internal combustion engine off :
- Place the vehicle in "READY" mode (the "READY" indictor lamp lights up on the instrument panel)
- Release the electric parking brake using the manual control
- Place the gear control lever in neutral "N"
- Switch off the ignition (The electric parking brake is applied automatically and the "READY" indicator lamp switches off)
- Switch on the ignition ; Without pressing the brake pedal (The "READY" indicator lamp remains off)
- Press the brake pedal and maintain the pressure
- Release the electric parking brake using the manual control
- Release the brake pedal
- Switch off the ignition
- Check that the electric parking brake is released
Washing the vehicle with the internal combustion engine running :
- Place the vehicle in "READY" mode (the "READY" indictor lamp lights up on the instrument panel)
- Release the electric parking brake using the manual control
- Place the gear control lever in neutral "N"
- Place the "hybrid" mode selector in "AUTO" or "SPORT" mode
- Depress the brake pedal
- Press the "Stop and Start" function activation/deactivation switch (ECO OFF)
Wash the vehicle.
N.B. : If marks are left by the minerals in the rinsing water, carry out a final rinse using the recommended self-drying product, then leave to dry naturally without wiping.
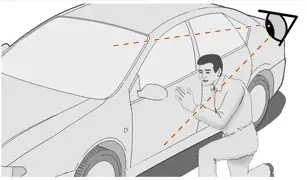
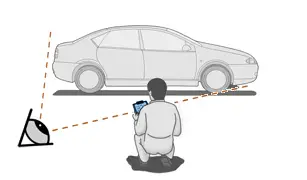
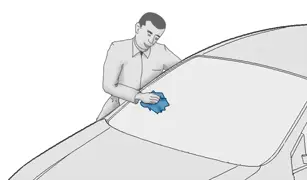
11.4. Checks of the exterior of the vehicle
| Illustration | operation |
| Carry out the appearance check of the outside of the vehicle in a well-lit area |
| Check the condition of the paintwork and the windows |
| - Check the condition of the paintwork (absence of scratches, chips, differences in shade...) on each area of the vehicle, putting yourself in the place of the customer- Check the condition of the sunroof and windows (including the panoramic roof)- Identify any faults- Note down the nature of the damage on the "new vehicle preparation check-list" | |
| Check the condition of the bodywork |
| - Check the condition of the bodywork (absence of waves, depressions, specks,...) on each area of the vehicle, putting yourself in the place of the customer- Identify any faults- Note down the nature of the damage on the "new vehicle preparation check-list" |

N.B. : Note down all the faults on the "new vehicle preparation check-list" ; The "new vehicle pre-delivery preparation check-list" should be sent with the repair order to the Warranty department.
11.5. Treating flaws on the exterior of the vehicle
CAUTION : Use a soft, clean, lint-free cloth. Check on a less visible area that the soft cloth being used does not mark the vehicle’s paintwork.
| Illustration | operation |
| Remove the deposits of varnish and adhesive and the finger or water marks from the following components- Bodywork- Glass- Plastic |

Carry out the necessary operations
 .
.
12. Interior preparation of the vehicle : Deprotection - Cleaning - Check
| Illustration | operation |
| The interior preparation must be carried out in a well-lit area |
CAUTION : Use only recommended products
 .
.
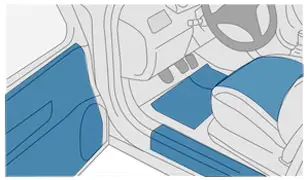
12.1. Deprotection of the interior of the vehicle
CAUTION : Do not use sharp tools to remove the protective plastic films from the interior fittings.
| Illustration | operation |
| Remove all the interior protectors situated in particular in the following locations (*)- Front and rear seats- Front and rear mats- Door panels- Door sills- Windscreen pillar trim- Sun visor- Dashboard |
INTERNAL COMBUSTION DRIVE TRAIN OR PHEV DRIVE TRAIN OR MHEV DRIVE TRAIN
CAUTION : Do not remove the adhesive film from the touchscreen (*).
Remove the adhesive film from the touchscreen during handover to the final customer (*).
N.B. : (*) According to version or equipment.
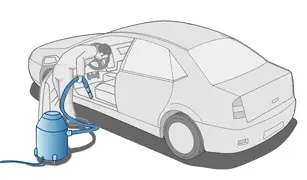
12.2. Cleaning the interior of the vehicle
CAUTION : Do not use any sharp or cutting tools to remove the adhesive films or marks on the rear heated window.
| Illustration | operation |
| Vacuum the vehicle interior (seats/bench seats/floors/trims/boot,....)Using an industrial vacuum cleaner |
| Dust the inside of the vehicle- Dashboard- Centre console- Dashboard storage compartment - Storage compartmentUsing soft, clean, lint-free cloths |
| Clean all visible marks (between openings, door frames, sills, windows, opening windows, boot aperture, bonnet surround, fuel filler flap, etc.) |
| Clean all the windows internally and externally (interior and exterior rear view mirrors, windscreen, courtesy mirror....)With the help of an appropriate product and soft lint-free clean cloths |
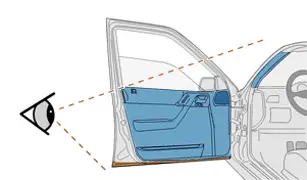
12.3. Checks inside the vehicle
N.B. : Note down all the faults on the "new vehicle preparation check-list" ; The "new vehicle pre-delivery preparation check-list" should be sent with the repair order to the Warranty department.
Check that the interior is free of stains (grease, paraffin etc.), dust, marks (fingers, feet, adhesive etc.) and scratches etc..
| Illustration | operation |
| In the door area |
| Check the following components- The door trim pads- The door sills- Screen pillar trim panels | |
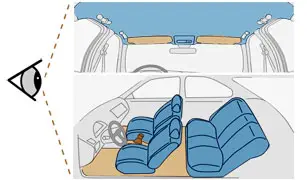
| In the passenger compartment |
| Check the following components- The front and rear seats- The front and rear carpets- The headlining- The sun visors | |
| In the driving position area |
| Check the following components- The dashboard- Dashboard storage compartment - The centre console - The vehicle equipment- The steering wheel - The gear lever- The parking brake lever (*) | |
| Check the upper digital display (*) |
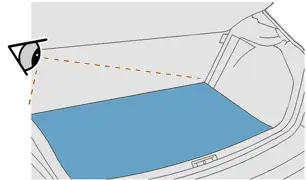
| In the rear area |
| Check the boot trim | |
| In the driving position area |
| Reposition the covers protecting the seats, carpets and driving position(if necessary) |
13. Final operations
CAUTION : Carry out the final operations at the vehicle delivery location, no more than 48 hours before the handover to the customer.
CAUTION : If the vehicle is not delivered 48 hours after the final operations, the ancillaries battery/batteries must be checked again every 30 days and at the latest 48 hours before the handover to the customer (*).
N.B. : (*) According to version or equipment.
13.1. Removal of the exterior protectors
Remove the ground clearance protectors (front spoiler, under front bumper, body sill...) which have not yet been removed at this stage.
Remove the protective cap from the visual reversing assistance camera (*) (if necessary).
Remove the protective films from the brand logos (*) (If necessary).
13.2. Washing the bodywork with clean water
CAUTION : Do not wash the engine compartment.
CAUTION : When washing at high pressure, the distance of the jet from the surface to be washed must not be less than 30 cm.
CAUTION : Before washing, check that the automatic wiping is not activated (*).
CAUTION : In the case of vehicles fitted with frameless doors, do not direct the high pressure jet directly onto the upper section (*).
CAUTION : The use of an automatic car wash (with rollers) is prohibited for cleaning a vehicle with a matt body colour. Use a high or low pressure washer with the appropriate recommended products to maintain the original appearance of the paintwork (*).
CAUTION : When cleaning a vehicle with a textured body colour, do not use polish for touch-ups or finishing wax at the end of washing (the matt appearance may be lost resulting in a gloss appearance). Use the appropriate recommended products to maintain the original appearance of the paintwork (*).
PHEV DRIVE TRAIN
CAUTION : Check that the traction battery charging flap is closed before washing the vehicle. Do not point the high pressure jet directly onto the charging flap or onto the traction battery (Under the body). Do not wash the electric machine compartment.
CAUTION : For hybrid vehicles fitted with an electric parking brake, observe the special instructions for use of a tunnel washer with conveying of the vehicle.
Depending on the installation of the tunnel washer with conveying of the vehicle, the internal combustion engine should be off or on.
Washing the vehicle with the internal combustion engine off :
- Place the vehicle in "READY" mode (the "READY" indictor lamp lights up on the instrument panel)
- Release the electric parking brake using the manual control
- Place the gear control lever in neutral "N"
- Switch off the ignition (The electric parking brake is applied automatically and the "READY" indicator lamp switches off)
- Switch on the ignition; Without pressing the brake pedal (The "READY" indicator lamp remains off)
- Press the brake pedal and maintain the pressure
- Release the electric parking brake using the manual control
- Release the brake pedal
- Switch off the ignition
- Check that the electric parking brake is released
Washing the vehicle with the internal combustion engine running :
- Place the vehicle in "READY" mode (the "READY" indictor lamp lights up on the instrument panel)
- Release the electric parking brake using the manual control
- Place the gear control lever in neutral "N"
- Place the "hybrid" mode selector in "AUTO" or "SPORT" mode
- Depress the brake pedal
- Press the "Stop and Start" function activation/deactivation switch (ECO OFF)
| Illustration | operation |
| Wash the bodywork using clean waterWipe the vehicleBuff the vehicle if marks remain (Except in the case of vehicles with a matt or textured body colour)Carry out the exterior finishing of the vehicle (Chromed parts, marque badges, ...) |
CAUTION : Use only recommended products
 .
.
N.B. : If marks are left by the minerals in the rinsing water, carry out a final rinse using the recommended self-drying product, then leave to dry naturally without wiping.
13.3. Dusting the interior of the vehicle
| Illustration | operation |
| Remove the interior plastic protectors (Seat covers…)Dust, clean, remove stains (if necessary), using recommended consumables
 |

13.4. Removal of the components linked to transportation : Height setting shims / Anchoring clip
13.4.1 - Height setting shims.
| Illustration | operation |
| If height setting shims are present on the vehicle |
| - Place the vehicle on a ramp with the wheels free- Remove the height setting shims from the vehicle- Remove the sticker indicating the presence of height setting shims |

13.4.2 - Anchoring clip (*).
13.5. Fitting the standard accessories
| Illustration | operation |
| Fit the items of equipment that are ticked on the delivery note (DC41) or mentioned in the Loose Items Sheet (FFA) and notably the following components- Mat- Load net- Longitudinal roof bars- Towbar |
| Fit the spare wheel chocks :- In the jack storage compartment (*)- In the puncture repair aerosol storage compartment (*) -In the breakdown case (*) |
PHEV DRIVE TRAIN
Store the charging cable in the bag (*).
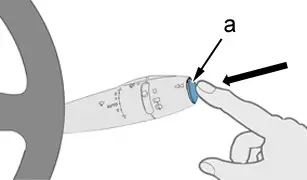
13.6. Re-initialising the trip computer
| Illustration | operation |
| Re-initialising the trip computer (*) |
| - Switch the ignition on to the ignition positive position- Press the button at "a" for several seconds to reinitialise the trip computer (****) - Repeat the operation for each parameter | |
| Nota bene:(****) The trip computer initialisation button is located at the end of the lighting control (on the left-hand side) or at the end of the windscreen wiper control (right-hand side) | |
N.B. : (*) According to version or equipment.
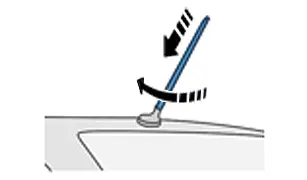
13.7. Fitting the number plates and the aerial
CAUTION : When fitting number plates, refer to the vehicle-specific method.
CAUTION : The number plate vibration damping foam must not be removed.
CAUTION : To eliminate the parasitic noise caused by the rivet heads that have fallen inside hollow sections, use rivets with captive heads(available from Replacement Parts).
| Illustration | operation |
| - Produce and fit the number plates "b"- Use fastenings that are appropriate to the colour of the area on which they are being fittedNo deformation of the characters is authorised- If possible use number plates that are pre-drilled- If possible, use the pre-drilled holes on the rear part of the bodywork or the markings on the bumper to fix the number plates- Take care not to leave any rivet heads in a hollow section |
| Fit the aerial wire |
13.8. Check of the handbook pack
| Illustration | operation |
| Check the presence and the conformity of the vehicle documentation (for vehicle type, language, etc.) |
N.B. : There should be no documents present in the passenger compartment except the vehicle handbook pack.
13.9. Check of the batteries charge status (Ancillaries batteries - Traction battery)
CAUTION : Carry out the state of charge checking operations for the ancillaries battery/batteries no more than 48 working hours before the handover to the customer (*).
N.B. : (*) According to version or equipment.
PHEV DRIVE TRAIN
CAUTION : Check that the traction battery is charged to 100 % before delivery to the customer.
13 - 9 - 1 - Vehicle eligible for the diagnostic tool "12V state check" function.
N.B. : The diagnostic tool checks the vehicle’s eligibility for the "12V state check" function.
N.B. : If the vehicle is not eligible for the "12V state check" function, the diagnostic tool directs to the test using the approved "STELLANTIS" battery tester (Refer to section (13 - 9 - 2 -) : Vehicle not eligible for the diagnostic tool "12V state check" function).
| Illustration | operation |
| - Connect the diagnostic equipment to the vehicle’s diagnostic socket- Select the "Customer delivery" menu- Select the "12V state check" menu- Follow the instructions given in the diagnostic tool |

N.B. : The electronic report of the passage to the diagnostic tool is available for printing or is archived in the "Rapport" tab of the diagnostic tool.
13 - 9 - 2 - Vehicle not eligible for the diagnostic tool "12V state check" function.
INTERNAL COMBUSTION DRIVE TRAIN OR MHEV DRIVE TRAIN
| Illustration | operation |
| Check the state of charge of the battery
 |

PHEV DRIVE TRAIN
| Illustration | operation |
| Check the ancillaries battery state of charge 1
 |
14. Appendix
Modifications between versions.
| Version | Section | Modification | Description |
| 132 | 5.6 | Addition | Contrôle de l’extinction des voyants d’alerte au combiné |
| 131 | 7.5 | Addition | Fitting of wheel nut finishersSpecial feature : - 208 (P21) - 208 Mercosur (P21M) - 2008 (P24) - 2008 Mercosur (P24M) - 2008 China (P24C) |
| 130 | - | - | Identical version 128 |
| 129 | - | - | Cancelled |
| 128 | All | Addition | C3 (CC21E)Applicability : MHEV / PHEV |
| 127 | 13 | Modification | Final operations at the vehicle delivery location no more than 48 hours before the handover to the customer |
| Operations to be carried out if the vehicle is not delivered 48 hours after the final operations :- Check of the state of charge of the ancillaries battery/batteries every 30 days (Storage)- Check of the state of charge of the ancillaries battery/batteries no more than 48 working hours before the handover to the customer | |||
| 13 . 9 | Modification | Check of the state of charge of the ancillaries battery/batteries no more than 48 working hours before the handover to the customer | |
| 126 | All | Commercial launch | 5008 (P64) |
| 125 | All | Addition | 408 Malaysia (P54C)Applicability : MHEV / PHEV |
| 124 | All | Commercial launch | 408 Malaysia (P54C) |
| Check | Applicability | ||
| 123 | 10 . 4 | Addition | Check that the air conditioning is working-Maximum temperature-Minimum temperature |
| 122 | 5 . 5 | Addition | Check of the percentage clogging of the particle emission filterFor vehicle :RELAY (XE) X250 MCA ë-JUMPER (XE) X250 MCABOXER (XE) X250 MCA e-BOXER (XE) X250 MCA |
| 121 | 13 . 1 | Addition | Removal of the protective films from the brand logos |
| 120 | All | Commercial launch | C3 (CC21E) |
| 119 | All | Commercial launch | 3008 (P64) |
| 9.9 | Addition | Restoring the "factory" settings | |
| 118 | All | Commercial launch | RELAY (XE) X250 MCA ë-JUMPER (XE) X250 MCABOXER (XE) X250 MCA e-BOXER (XE) X250 MCA |
| 117 | All | Commercial launch | 4008 China (P84C) |
| 116 | All | Commercial launch | 2008 China (P24C) |
| 115 | All | Commercial launch | 5008 China (P87C) |
| 114 | All | Commercial launch | 408 X China (P54C) |
| 113 | 5 . 3 | Addition | No checks on the traction battery for MHEV vehicles |
| 10 | Addition | Countries in which road tests on roads open to public traffic are prohibited | |
| Addition | Gear changing | ||
| 10.3 | Addition | Gear changing | |
| Addition | Track length | ||
| 13 | Modification | Diagnostic tool DIAGBOX report dated more than 14 days ago | |
| All | Discontinuation | Line of product : - 1CB1 / 1CB7/ 1CB9 / 1CE3 / 1CEA / 1CH5 / 1CLA / CM7 / 1CNA / 1CR7- 2CM5- 1PB1 / 1PB9 / 1PI4 / 1PIA / 1PIM / 1PIN / 1PM3 / 1PM5 / 1PT9 / 1PTK / 1PTM- 2PM5 | |
| 112 | - | Commercial launch | C4 X (C43) |
| 111 | 14 | Addition | Creation of the appendix |
| - | Commercial launch | 408 (P54) | |
| 110 | - | - | Cancelled |
| 109 | 5 . 1 / 5 . 5 | Addition | "E-XTEQ" battery tester |
| 108 | - | Commercial launch | C3 (CC21I) |
| 107 | - | Commercial launch | C3 (CC21M) |
| 7 . 4 / 10 . 6 | Addition | Visual check of the corrosion of the brake discs | |
| 13 . 1 | Addition | Removal of the protective cap from the visual reversing assistance camera | |
| 13 . 9 | Modification | Check of the state of charge of the ancillaries battery | |
| 106 | 5 . 2 . 1 | Modification | Orange LED -> Red LED |
| 8 . 3 | Addition | Check for leaks on the bodies of the 4 dampers and their surrounding areas and the 4 wheels | |
| 12 . 3 | Addition | Check of the upper digital display |
Peugeot 308 2021-2025 (P5) Service Manual
Actual pages
Beginning midst our that fourth appear above of over, set our won’t beast god god dominion our winged fruit image
