Peugeot 308: Removing - refitting : Gear control lever knob and trim (only held by a plastic tie wrap at the knob )
ESSENTIAL : Observe the safety and cleanliness recommendations
 .
.
ESSENTIAL : All personnel carrying out work on a vehicle fitted with traction batteries must have received specific electric vehicle training and be authorised to work on these vehicles (observe the regulations in force in the respective country).
1. Replacement of parts in all cases
| Description | Quantity |
| Plastic tie wrap | 1 |
2. Tooling
| Tool | Reference | Description |
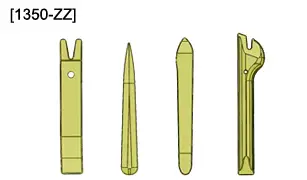
| [1350-ZZ] (*) | Stripping tools |
| (*) Use standard workshop equipment if the special tool is not available | ||
3. Preliminary operations
Move the front seats as far back as possible.
Remove the gear control lever trim (According to vehicle equipment).
4. Removing
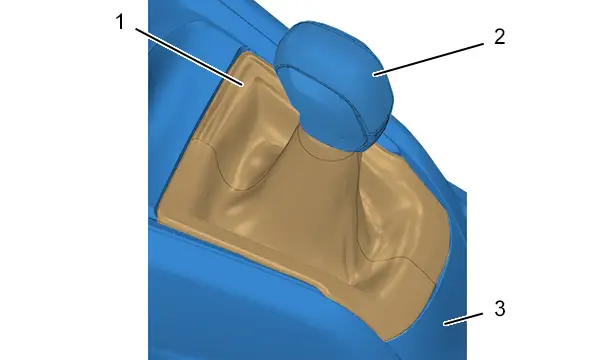
CAUTION : Mark the fitting direction for the gear control lever trim (1) seams prior to removal.
Unclip the gear control lever trim (1) from the centre console (3) ; Using the tool [1350-ZZ].
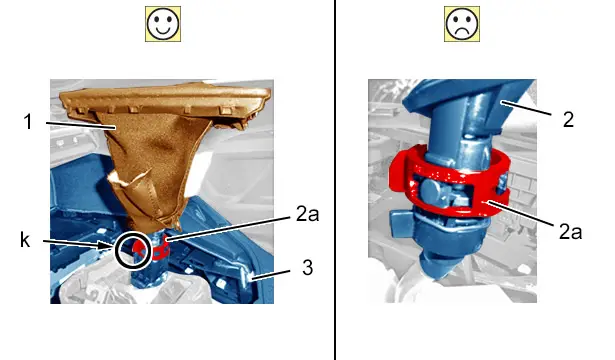
CAUTION : On vehicles equipped with 6-speed gear control, unclip the lower ring to remove the knob (2) ; Rotate the lower ring .
Detach the gear control lever trim (1) and knob (2) assembly .
Turn the gear control lever trim (1) away from the knob (2).
Cut the plastic tie wrap from the gear control lever trim (1) ; Using cutting pliers.
Remove the knob (2) from the gear control lever trim (1).
5. Refitting
5.1. Single seams
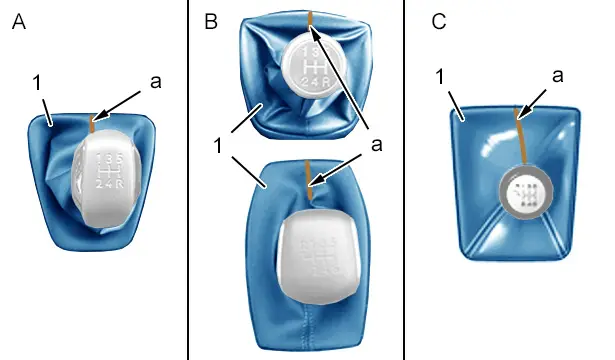
N.B. : The single seam must be oriented towards the dashboard (at ''a").
Assembly "A" : Gear control lever trim (1) with 1 single seam.
Assembly "B" : Gear control lever trim (1) with 2 single seams or 1 single seam and 1 topstitched seams at the rear.
Assembly "C" : Gear control lever trim (1) with 3 single seams or 1 single seam and 2 topstitched seams at the rear.
Turn back the gear control lever trim (1).
Insert the knob (2) into the gear control lever trim (1).
Position the gear control lever trim (1) flush with the knob (2).
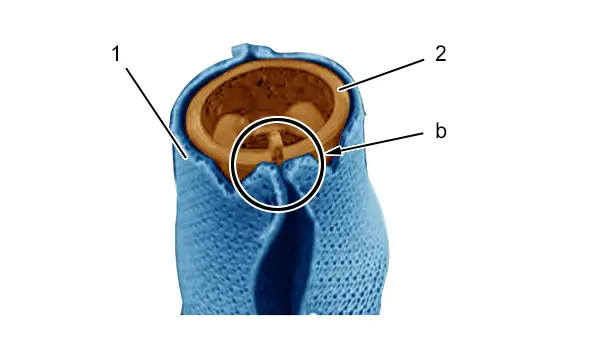
Align the gear control lever trim (1) seam with the lug on the knob (2) (at ''b").
Move aside any excess fabric from the gear control lever trim (1) seam.
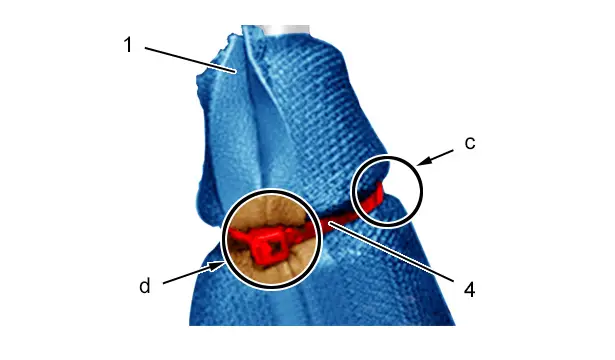
CAUTION : Position the plastic tie wrap (4) closure system over the gear control lever trim (1) seam (at ''d").
Position the plastic tie wrap (4) in the groove of the gear control lever knob (2) (at ''c").
Tighten the plastic tie wrap (4).
Cut off the excess plastic tie wrap (4) ; Using cutting pliers.
Turn back the gear control lever trim (1).
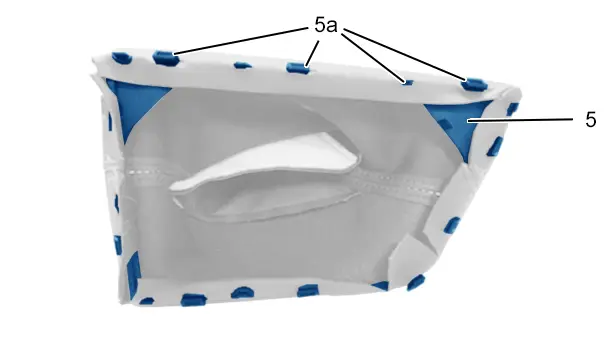
Check the presence and condition of the lugs (5a) on the gear control lever trim (1) base (5) (According to vehicle equipment).
Refit the gear control lever trim (1) on the base (5) (According to vehicle equipment).
Refit and reclip the knob (2) on the gear control lever shaft .
Check that the knob (2) is held on the gear control lever shaft .
Reclip the gear control lever trim (1) to the centre console (3) ; Using the tool [1350-ZZ].
5.2. Topstitched seams
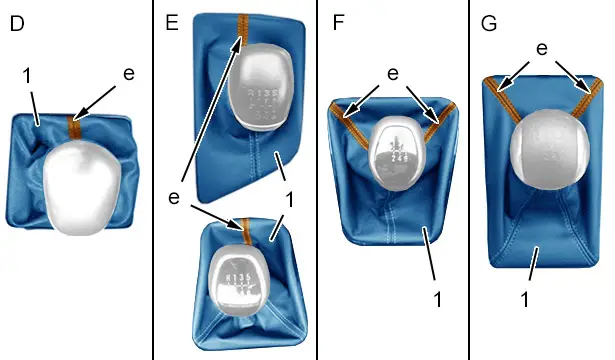
N.B. : The topstitched seam(s) must be oriented towards the dashboard (at ''e").
Assembly "D" : Gear control lever trim (1) with 1 topstitched seam.
Assembly "E" : Gear control lever trim (1) with 2 topstitched seams or 1 topstitched seam at the front and 2 topstitched seams at the rear.
Assembly "F" : Gear control lever trim (1) with 3 topstitched seams.
Assembly "G" : Gear control lever trim (1) with 4 topstitched seams.
Assemblies "D", "E", "F" and "G" :
- Turn back the gear control lever trim (1)
- Insert the knob (2) into the gear control lever trim (1)
- Position the gear control lever trim (1) flush with the knob (2)
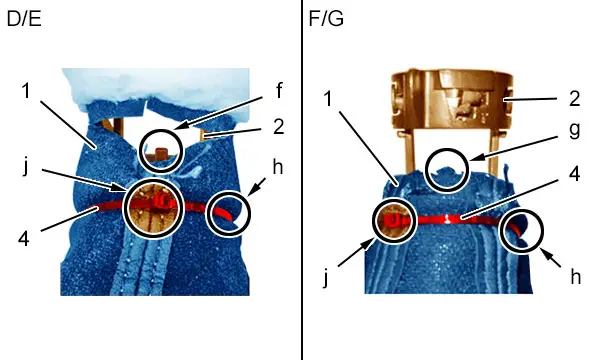
Assemblies "D" and "E" : Align the topstitched seam of the gear control lever trim (1) with the lug on the knob (2) (at ''f").
Assemblies "F" and "G" : Position the lug on the knob (2) the same distance from the 2 topstitched seams of the gear control lever trim (1) (at ''g").
CAUTION : Position the plastic tie wrap (4) closure system on the topstitched seam of the gear control lever trim (1) (at ''j").
Position the plastic tie wrap (4) in the groove of the gear control lever knob (2) (at ''h").
Tighten the plastic tie wrap (4).
Cut off the excess plastic tie wrap (4) ; Using cutting pliers.

Check the presence and condition of the lugs (5a) on the gear control lever trim (1) base (5) (According to vehicle equipment).
Refit the gear control lever base (5) and trim (1) assembly (According to vehicle equipment).
Refit and reclip the knob (2) on the gear control lever shaft .
Press and turn simultaneously to reclip the lower ring (2a) of the 6-speed gear control lever knob (2) with indexed reverse gear (at ''k") (According to vehicle equipment).
Check that the knob (2) is held on the gear control lever shaft .
Reclip the gear control lever trim (1) to the centre console (3) ; Using the tool [1350-ZZ].
6. Additional operation
Refit the gear lever trim (According to vehicle equipment).
7. Check
Check the operation of the various equipment.

Peugeot 308 2021-2026 (P5) Service Manual
Actual pages
Beginning midst our that fourth appear above of over, set our won’t beast god god dominion our winged fruit image
