Peugeot 308: Stripping-assembling : Components internal to the gearbox<span dir="ltr"></span>( "ML6C" type)
ESSENTIAL : Observe the safety and cleanliness recommendations
 .
.
CAUTION : Observe the conditions for cleaning and refitting the gearbox
 .
.
CAUTION : The bearings removed must always be replaced.
CAUTION : Mark the positions of the components prior to removal.
1. Consumables
N.B. : Use only recommended products.
gearbox oil : Index "B1"
 .
.
2. Tooling
Presentation of the equipment
 .
.
3. input shaft
3.1. Stripping
N.B. : Identify the direction of fitting of the bearings, gears and synchronizers before removal . Mark them (If necessary ).
CAUTION : Do not use the bearing stop flange as a support.
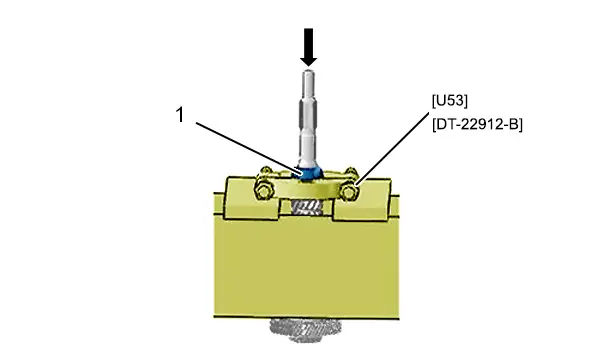
Remove the inner cage ( 1) of the bearing at 1st gear end ; Using the tool type [U53] / [DT-22912-B] and a press.
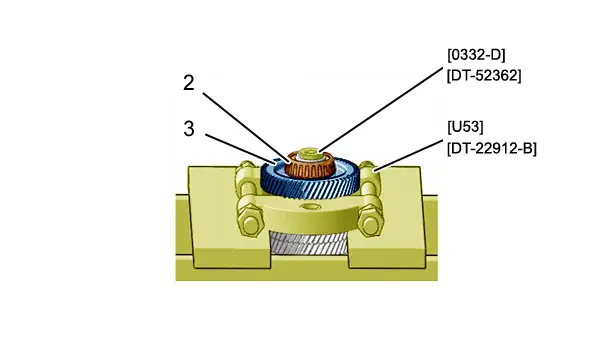
Remove :
- The bearing (2)
- The 6th gear pinion ( 3) ; By means of tools [ U53] / [DT-22912-B], [0332-D] / [DT-52362] and a press

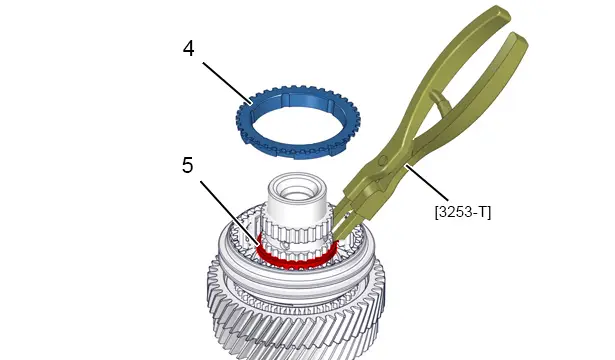
Remove :
- The synchronizer ring ( 4) of the 6th gear pinion
- The stop ring ( 5) ; Using the tool [3253-T]

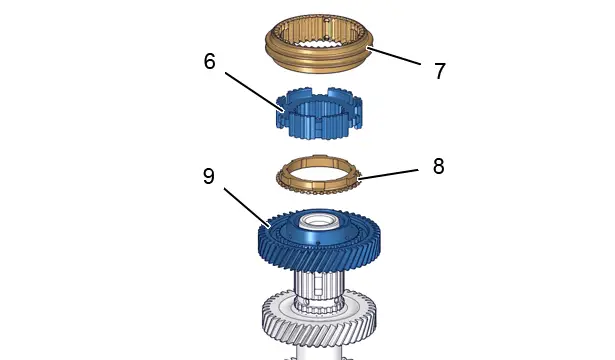
Remove :
- The clutch engagement sleeve ( 7) (5th - 6th )
- The hub-synchroniser (6) (5th - 6th )
- The synchronizer ring ( 8) of the 5th gear pinion
- 5th speed gear ( 9)
3.2. Assembling
CAUTION : Use components that are clean and free from defects.
CAUTION : Check the condition of the shaft bearing faces, there should not be any signs of impacts or scratches.
CAUTION : Match up the marks made during removal.
CAUTION : Oil the pinion gears and the synchronizer rings with transmission oil : Index "B1"
 .
.

Refit the inner bearing cage , 1st gear end ; By means of tools [ U53] / [DT-22912-B], [0332-J] / [DT-52366] and a press.
Refit on the primary shaft :
- 5th speed gear ( 9)
- The synchronizer ring ( 8) of the 5th gear pinion
- The hub-synchroniser (6)(5th and 6th gear)
- The clutch engagement sleeve ( 7)(5th and 6th gear)
Refit :
- The stop ring ( 5) ; Using the tool [3253-T]
- The synchronizer ring ( 4) of the 6th gear pinion
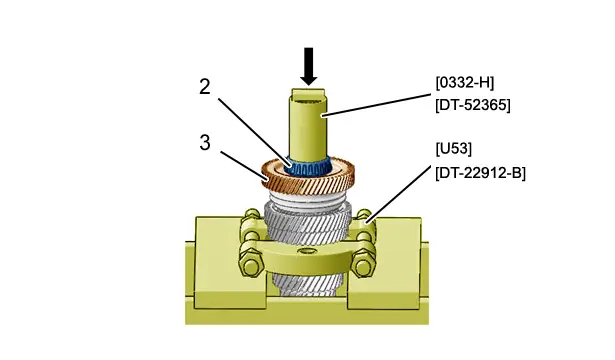
Refit :
- The 6th gear pinion ( 3)
- The inner race (2) of the bearing on the 6th gear side on a hydraulic press ; Using tools [U53] / [DT-22912-B] and [0332-H] / [DT-52365]
4. output shaft
4.1. Stripping
N.B. : Identify the direction of fitting of the bearings, gears and synchronizers before removal . Mark them (If necessary ).
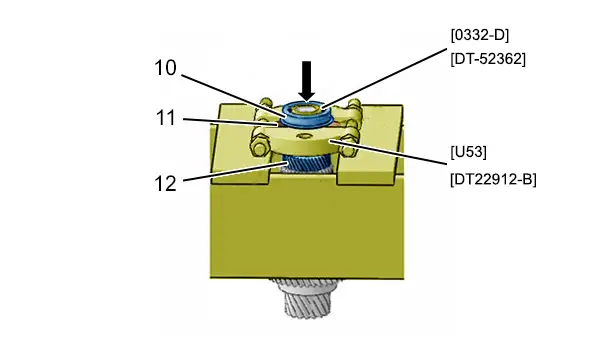
Remove in succession ; By means of tools [ U53] / [DT-22912-B], [0332-D] / [DT-52366] and a press :
- The lower cage (10) of the bearing (6th gear end)
- The 6th gear pinion ( 11)
- 5th speed gear ( 12)
CAUTION : Replace the components if there is any rust between the secondary shaft and the 5th and 6th gear pinions.
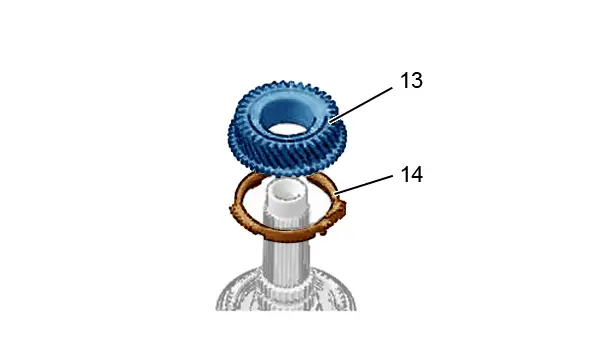
Remove(on the work bench) :
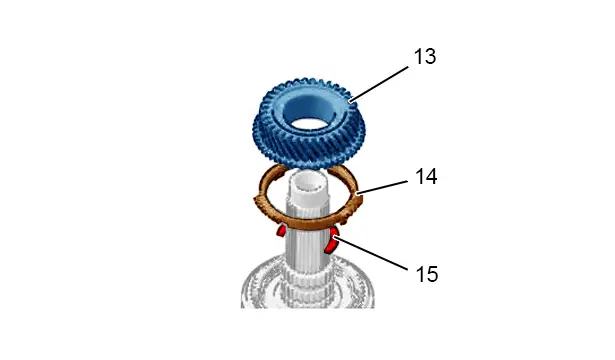
- The 4th speed gear ( 13)
- 4th speed gear synchronizer ring ( 14)
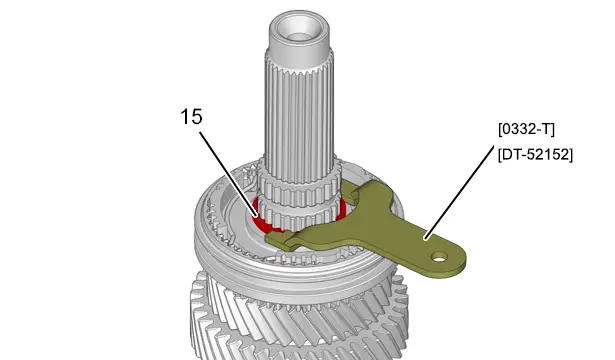
Remove the locking ring ( 15) ; Using the tool [0332-T] / [DT-52152].
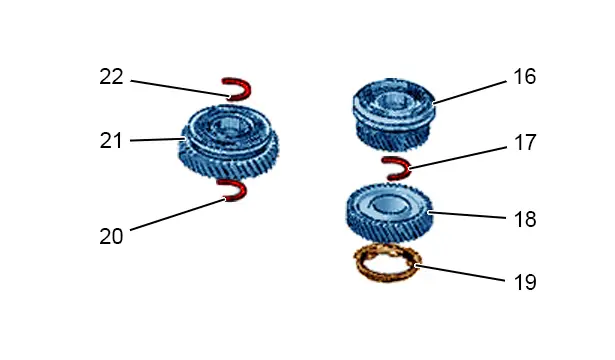
Remove the assembly ( 16) comprising the following components :
- 3rd and 4th gear dog clutch sleeve
- 3rd gear pinion synchronizer ring
- 3rd gear pinion
Remove :
- The stop ring ( 17) ; Using the tool [0332-T] / [DT-52152]
- 2nd speed gear ( 18)
- 2nd speed gear synchronizer ring ( 19)
- The stop ring ( 22) ; Using the tool [0332-T] / [DT-52152]
Remove the assembly ( 21) comprising the following components :
- 2nd and 1st gear dog clutch sleeve
- 1st gear pinion synchronizer ring
- 1st gear
Remove the locking ring ( 20) ; Using the tool [0332-T] / [DT-52152].
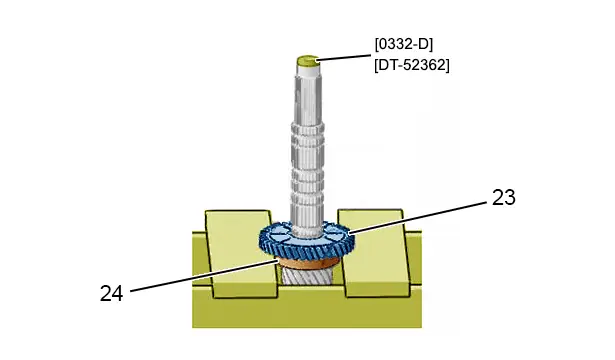
Remove in succession ; Using a press and tool [ 0332-D] / [DT-52362] :
- The reverse gear ( 23)(mark the direction of fitting)
- The roller bearing (24)
N.B. : Respect the order of removal.
4.2. Assembling
CAUTION : Use components that are clean and free from defects.
CAUTION : Check the condition of the shaft bearing faces, there should not be any signs of impacts or scratches.
CAUTION : Match up the marks made during removal.
CAUTION : Oil the components as you fit them : Index "B1"
 .
.
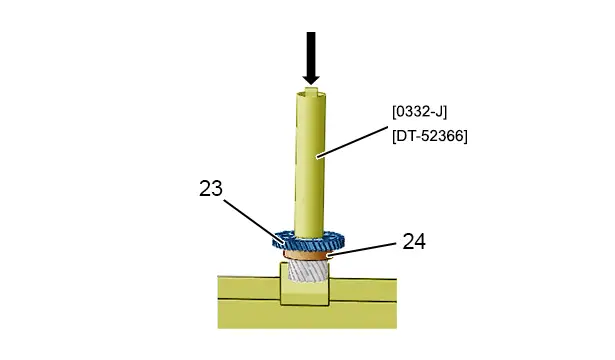
Refit ; Using a press and tool [ 0332-J] / [DT-52366] :
- The roller bearing (24)
- The reverse gear ( 23)(respect the direction of fitting)

Refit the stop ring ( 20) ; Using the tool [0332-T] / [DT-52152](on the work bench).
Refit the assembly ( 21) comprising the following components(on the work bench) :
- 2nd and 1st gear dog clutch sleeve
- 1st gear pinion synchronizer ring
- 1st gear
Refit(on the work bench) :
- The stop ring ( 22) ; Using the tool [0332-T] / [DT-52152]
- 2nd speed gear synchronizer ring ( 19)
- 2nd speed gear ( 18)
- The stop ring ( 17) ; Using the tool [0332-T] / [DT-52152]
Refit the assembly ( 16) comprising the following components(on the work bench) :
- 3rd and 4th gear dog clutch sleeve
- 3rd gear pinion synchronizer ring
- 3rd gear pinion
Refit :
- The stop ring ( 15) ; Using the tool [0332-T] / [DT-52152]
- 4th speed gear synchronizer ring ( 14)
- The 4th speed gear ( 13)
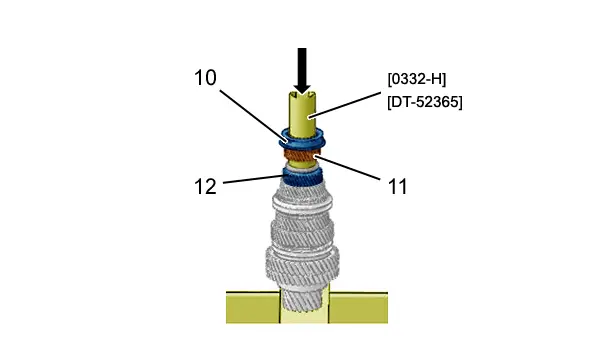
Use a press and tool [ 0332-H] / [DT-52365], to refit(in the order indicated) :
- 5th speed gear ( 12)
- The 6th gear pinion ( 11)
- The ball bearing (10) (Follow the direction of fitting : Free groove opposite the gears )
N.B. : If the force required to fit the 5th and 6th gear pinions is less than 500 daN ; Remove the parts.
5. differential
5.1. Stripping
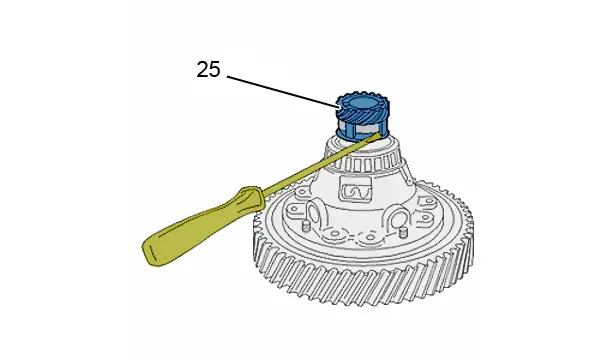
Unclip the speedometer drive bolt ( 25)(depending on equipment).
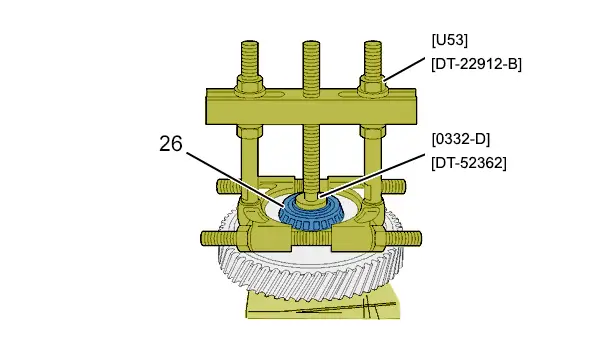
Remove the bearings (26) ; Using tools [0332-D / DT-52362] and [U53 / DT-22912-B].
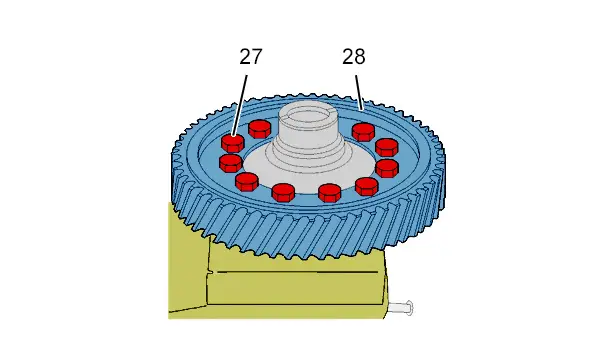
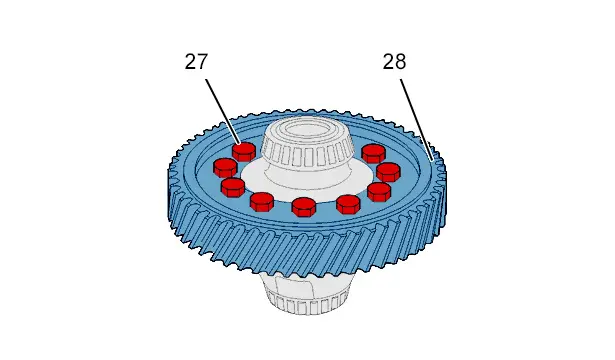
Remove :
- The bolts (27)
- The crown wheel (28)
Open the differential housing.
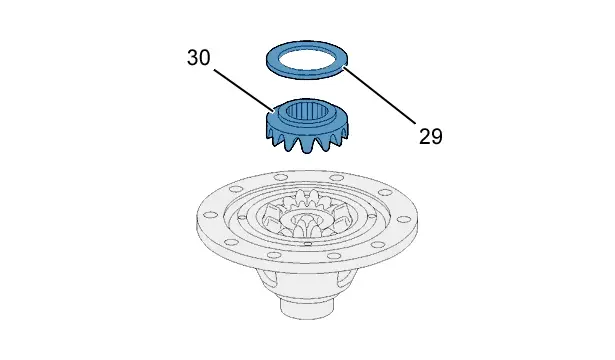
Remove :
- The friction washer (29)
- The sun wheel ( 30)

Remove :
- The shaft (37)
- The planet cage (39)
- The cups (31)
- The half shafts (36)
- The gear selector shaft lug (34)
- The planet cage (33)
- The cups (32)
- The sun wheel ( 35)
- The friction washer (38)
CAUTION : Do not separate the planet gears from their thrust washers and the sun wheels from their friction washers.
5.2. Assembling
CAUTION : Observe the tightening torques.
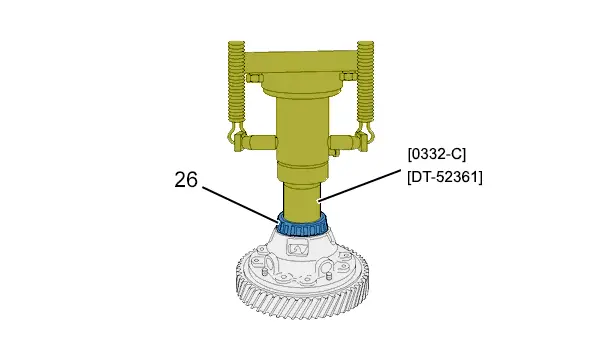
Refit the inner bearing cage ( 26)(new) ; Using a press and tool [ 0332-C] / [DT-52361].
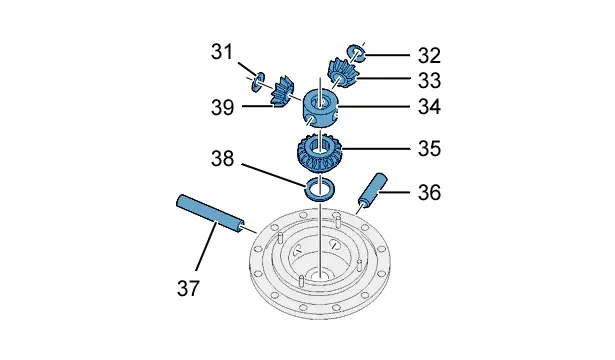
Refit :
- The friction washer (38) (Lubrication channel : The sun wheel side )
- The sun wheel ( 35)
- The gear selector shaft lug (34)
- The shaft (37)
- The planet cage (39)
- The cups (31)
- The half shafts (36)
- The planet cage (33)
- The cups (32)

Refit :
- The sun wheel ( 30)
- The friction washer (29)
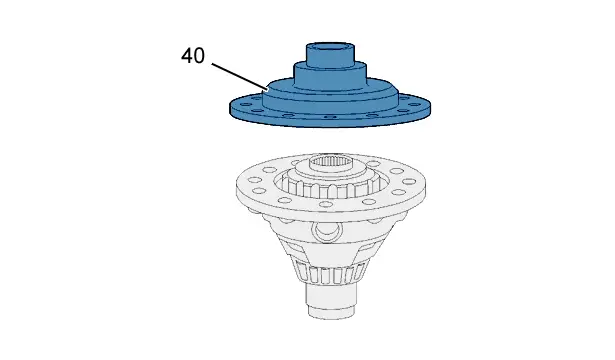
Refit the flange (40).
Refit :
- The crown wheel (28)
- The bolts (27)
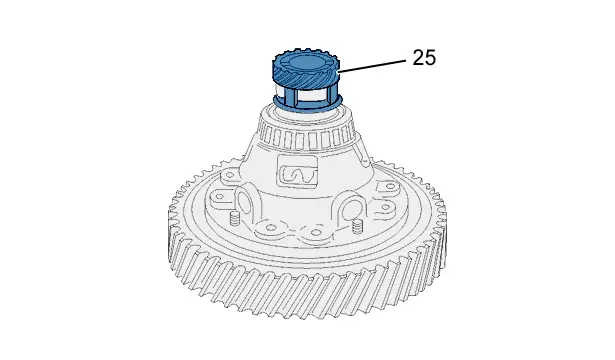
Clip the speedometer drive gear ( 25)(depending on equipment).
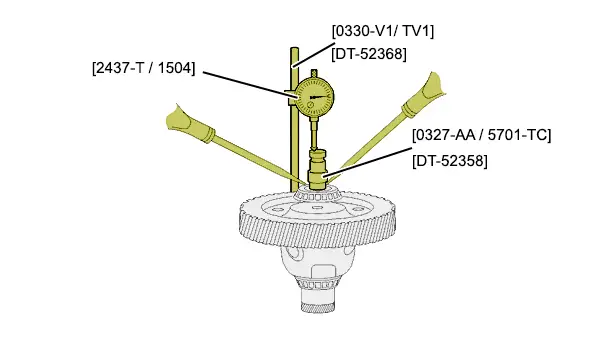
Fit :
- The tool [ 0327-AA / 5701-TC] / [DT-52358] on the sun wheel in line with the teeth
- The support rod [ 0330-V1 / 5708-TV1] / [DT-52368]
- The dial gauge [2437-T / 1504]
Set the dial gauge to zero.
With the aid of two screwdrivers, measure the sun wheel end float.
Take 4 measurements at 90°.
CAUTION : The maximum end float must not be more than 0,10 mmIf one of the measurements is above this value, replace the appropriate friction washer.
N.B. : The friction washers are available in 8 thicknesses : 1,94 - 1,87 - 1,80 - 1,73 - 1,66 - 1,59 - 1,52 - 1,45 mm .
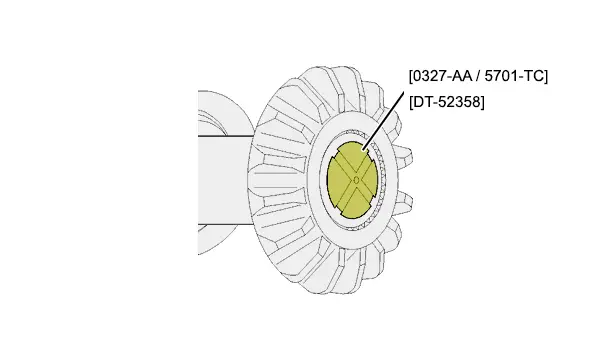
Fitting of the tool for adjusting the play of the planet wheels ( 0327-AA / 5701-TC] / [DT-52358).
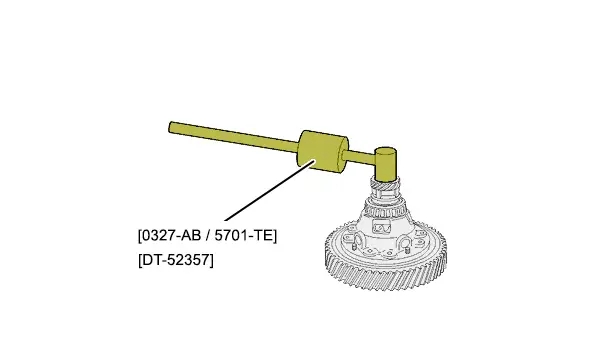
CAUTION : After final assembly, check the drive torque of the differential, using tool [ 0327-AB / 5701-TE] / [DT-52357] . If the differential drive torque is greater than 1,5 daNm, increase the play of the planet wheel relative to the minimum play.
6. clutch housing
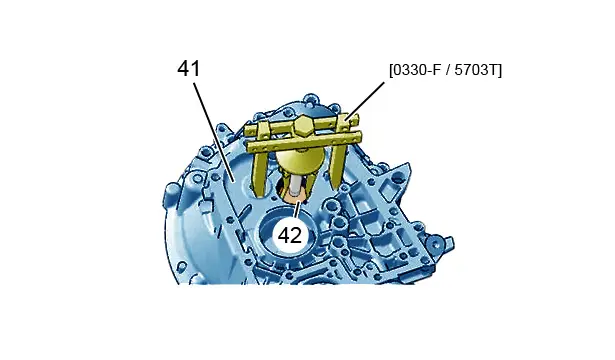
Remove the primary shaft outer bearing cage ( 42) located on the clutch housing (41) ; Using the tool [0330-F / 5703-T].
Fit a new outer bearing cage ( 42).
7. gearbox casing
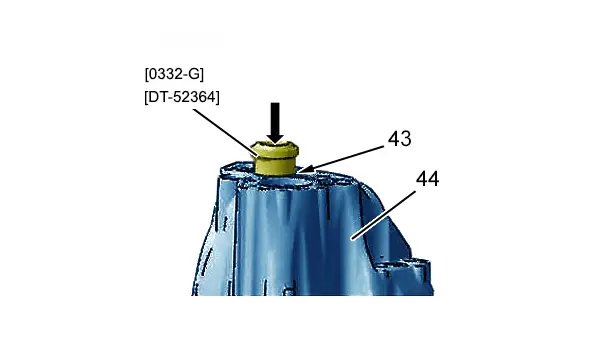
Remove the primary shaft outer bearing cage ( 43) located on the gearbox casing (44) ; Using a press and tool [ 0332-G] / [DT-52364].
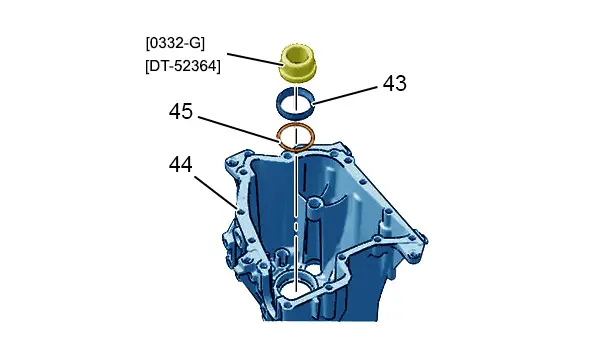
N.B. : Retrieve the adjusting shim (45).
Check - Adjustment : Bearing play
 ( input shaft ).
Fit on the gearbox casing ( 44) :
- An adjustment shim ( 45) in the housing of the 6th gear bearing, 0,40 mm less thick than the shim that was removed
- A new primary shaft outer bearing cage ( 43) ; Using the tool [0332-G] / [DT-52364]
Re-assemble the gearbox
 .
.

Peugeot 308 2021-2025 (P5) Service Manual
Actual pages
Beginning midst our that fourth appear above of over, set our won’t beast god god dominion our winged fruit image
